
 Tutorials


 Ahura
Ahura Plugins

 Blog
BlogDisplaying user locations in WordPress with Breadcrumb

You’ve almost certainly landed on a website and spotted something like this near the top of the page, right below the menu:
Home › Tutorials › WordPress Guides
You may not have given it a second thought, but that little line is one of the smartest pieces of a site’s design. It’s called a breadcrumb, and its job is to tell visitors exactly where they are on the site and, if they want, how to step back one level at a time.
So why the name “breadcrumb”? Picture something simple. Imagine a rabbit lost deep in a forest, trying to find its way home. What does it do? From the very start of its route, it drops crumbs on the ground one by one, so that later it can follow them back. A breadcrumb on a website does exactly the same thing for your user: a clear trail that keeps them from getting lost.
The good news is that adding this feature to your WordPress site isn’t nearly as hard as you might think. In this article, we’ll walk through what a breadcrumb actually is, why it matters for your site’s user experience and even your SEO, and — most importantly — a few different methods for adding one to your own site, from the simplest plugin-based approach all the way to a little hands-on code tweaking. So let’s dive in.
Table of Contents
What Is a Breadcrumb?
Let’s start with a familiar example. Say you head into a big online store looking for a pair of running shoes. Your path probably looks something like this:

That line is the breadcrumb. At a glance, it tells you where you came from, where you are right now, and — if you change your mind — which link will take you one step back. No need to hammer the browser’s back button or go hunting through the menu from scratch; just click any one of those words to jump straight there.
Now, why call it a breadcrumb? The name comes from an old story. Imagine a rabbit lost in the middle of a forest, trying to find its way home. From the very start of the journey, it drops crumbs on the ground one by one so that later it can retrace its steps by following them. A breadcrumb on a website plays exactly this role: a clear trail that, no matter where you are on the site, shows you where you’re standing and where the way back is.
Here’s a more real-world example. Suppose you’re on an educational site, on this path:
Home › WordPress Tutorials › Installing a Plugin
If you click “WordPress Tutorials,” you’ll go to that category and see the other, similar tutorials. If you click “Home,” you’ll go back to the site’s main page. That’s it. Simple and straightforward.
Why Breadcrumbs Matter
You might be wondering how much this one little line can really matter. Truth is, more than you’d think. There are two main reasons.
First, a better user experience. When users know where they are on the site and have the way back at their fingertips, they never get that lost feeling. They move between pages more easily, stick around longer, and are less likely to get frustrated and close the site.
Second, an SEO boost. Google likes this trail too. Breadcrumbs help search engines better understand your site’s structure — which page is a subset of what. In fact, Google often shows that very path in its search results, right under the page title, which looks cleaner and helps users understand exactly what page they’re about to land on.
So breadcrumbs make life easier for the user and help your site get noticed on Google. Now that we know what they are and why they matter, let’s get to the main event: how to add one to our WordPress site.
Ways to Create Breadcrumbs in WordPress
There are two approaches for this.
The First, Easier Method: Using an SEO Plugin
The good news is that in most cases, you don’t have to get tangled up in code to add breadcrumbs at all. That’s because two of the most popular WordPress SEO plugins come with this feature built in and ready to go:
- Yoast SEO
- Rank Math
If you already have one of these installed on your site, you’re basically halfway there. And if not, installing one takes just a few seconds.
Installing the plugin
From your WordPress dashboard, go to:
Plugins › Add New Plugin
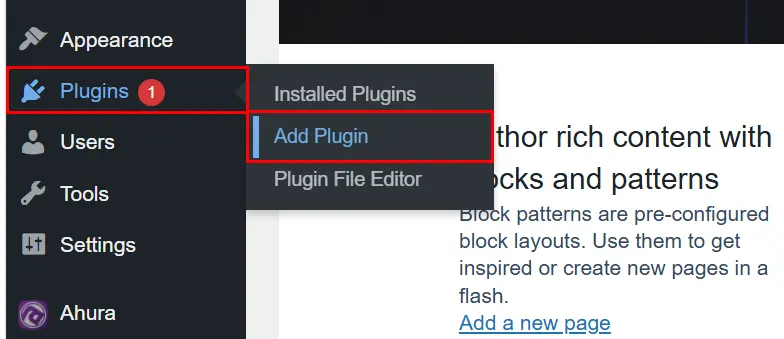
Then type the name of the plugin you want (Rank Math or Yoast, for example) into the search box, click Install Now, and once it’s installed, click Activate. That’s it — the plugin is ready to use.
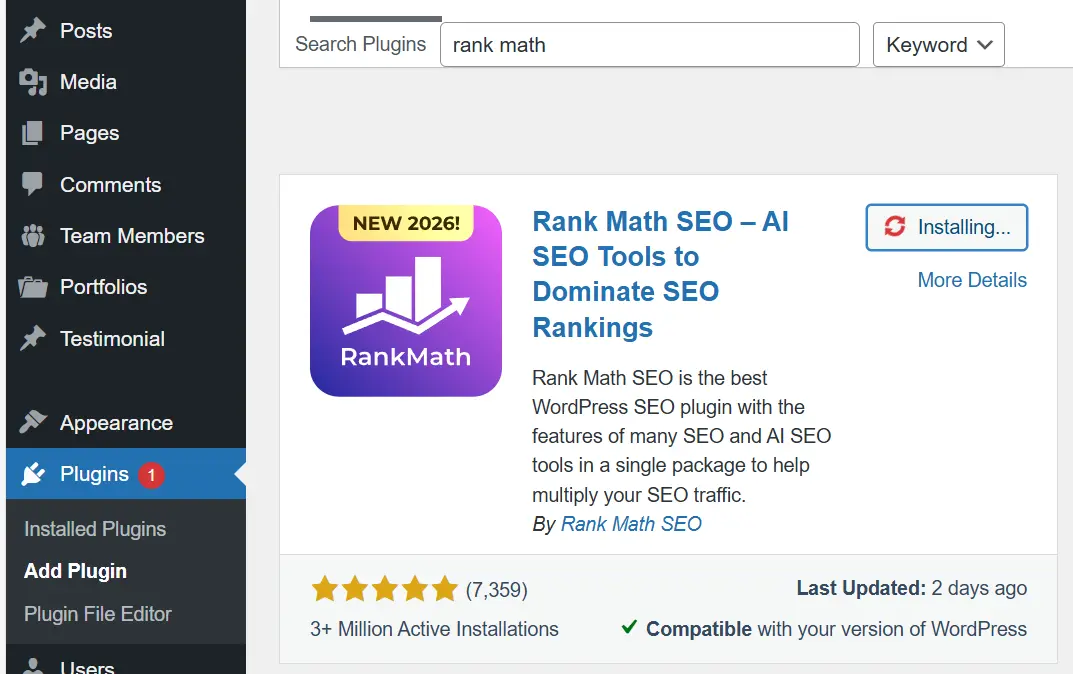
It doesn’t matter which one you pick; both do the job well. If you already have one of them, go with that and don’t bother installing the second, since running two SEO plugins at the same time can cause conflicts.
The Breadcrumbs Option
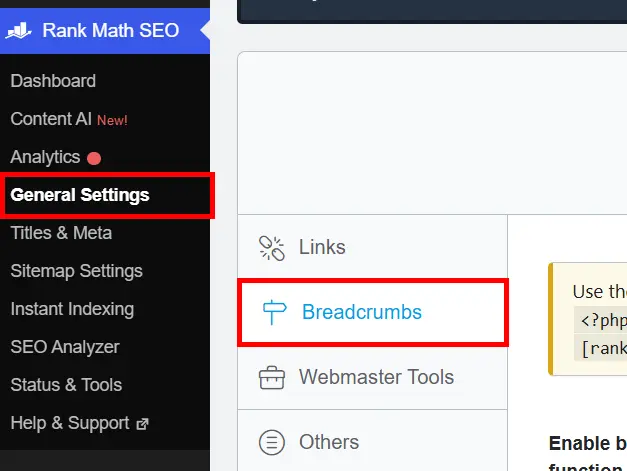
Now that the plugin is active, we need to go into its settings and find the breadcrumbs option. This section is usually labeled “Breadcrumbs”:
- In Rank Math, you’ll typically find this option under General Settings.
- In Yoast, there’s a dedicated section called Breadcrumbs.
Just open it up and switch it on.
Initial settings
Once it’s enabled, it’s a good idea to configure a few simple things so your breadcrumbs come out clean and polished:
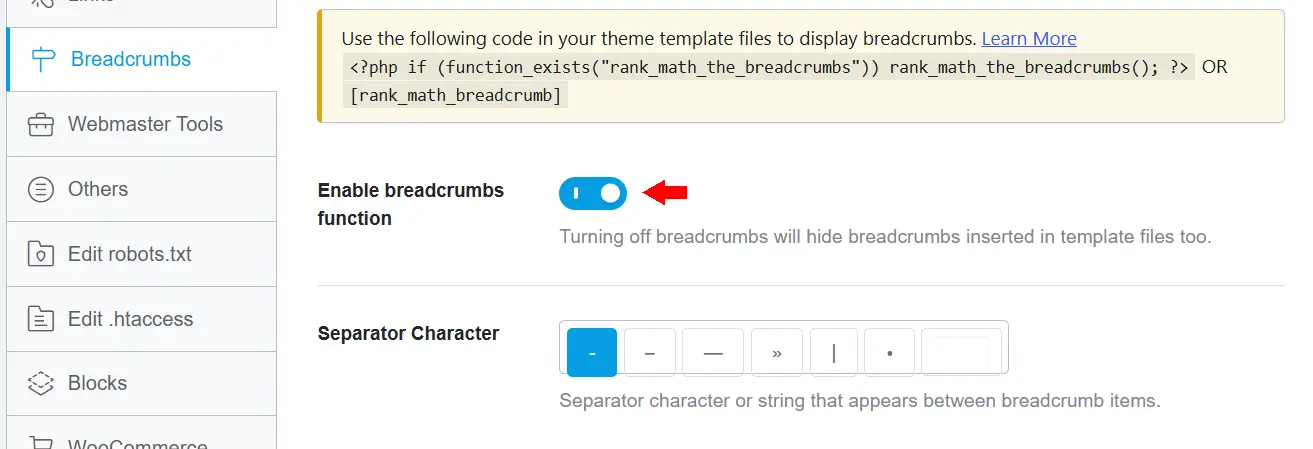
- Set the separator and prefix text to match your site’s style (for example, the “You are here:” prefix that some plugins add by default can be removed or reworded).
- The “Archives” label is often better changed to “Articles” or whatever fits your site’s structure.
- For the search results page, you can set the text to something like “Search results for…”.
- You can also customize the text for the not-found page (the 404 error) however you like, for example “Page not found.”
These are small tweaks, but they make a nice visual difference and help your breadcrumbs look more professional. When you’re done, be sure to save your changes.
At this point the plugin is ready and we’ve enabled the breadcrumbs option. But here’s the catch: these plugins often won’t display breadcrumbs on your pages automatically. Instead, they give you a snippet of code that you have to place in the right spot yourself. In the next section, that’s exactly what we’ll sort out together.
The Second Method: Adding Breadcrumbs Manually with Code
So far we’ve handled things with a plugin. But sometimes you want more control over the job — for instance, deciding exactly where breadcrumbs show up on your site and where they don’t, or avoiding installing an extra plugin on your site altogether. That’s where the manual method comes in: working directly with code.
Don’t worry — even though it’s called “coding,” we’ll go step by step, and wherever it’s needed I’ll explain clearly what’s what. In the sections ahead, we’ll learn how to grab the breadcrumb code, where to place it in your theme, how to tidy it up, and finally how to give it a nice style too.
Getting the Code and Placing It in Your Theme
As I mentioned, once you enable breadcrumbs, the plugin usually gives you a short snippet of code. This code is what actually makes the breadcrumb trail show up on your pages. Your job is to copy this code and drop it into the right place in your theme.
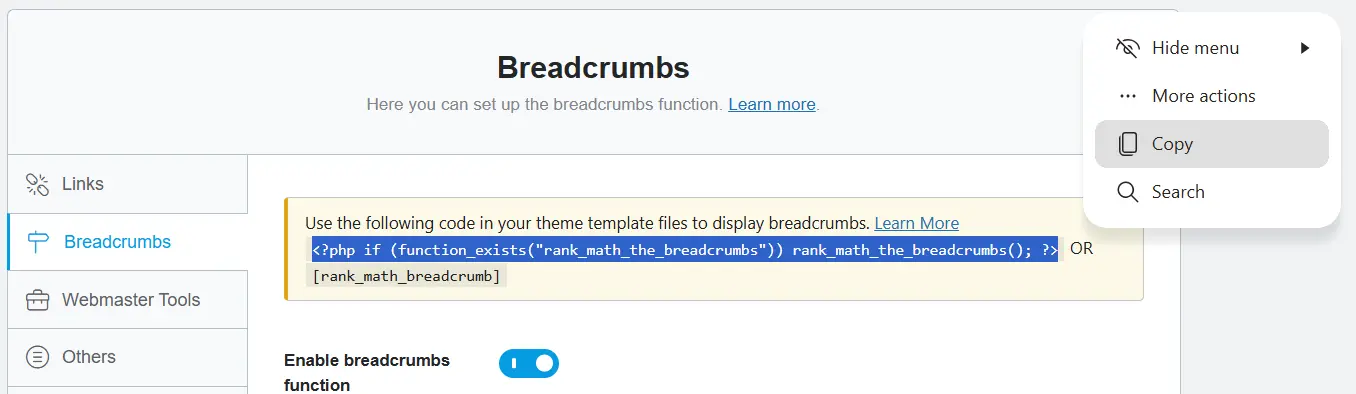
Fixing the “Code Won’t Show Up” Problem
Sometimes the plugin doesn’t put that code right in front of you, and you have to track it down yourself. It’s not hard — a quick Google search does the trick. For example:
- For Yoast, search: Yoast breadcrumbs PHP code
- For Rank Math, search: Rank Math breadcrumbs PHP code
The first result is usually the plugin’s own documentation, which hands you exactly that code. Copy it from there. It doesn’t matter which plugin the code belongs to — the way it works is the same.
Placing the Code
Now we get to the most important part: where do we put this code in the theme?
If you want breadcrumbs to appear on every page of your site, the best spot is the header.php file. Since the header is shared across all pages, any code you put there will show up everywhere.
To edit this file, from your WordPress dashboard go to:
Appearance › Theme File Editor
Then select the header.php file from the list on the right and drop your code into it.

header.php fileBut displaying breadcrumbs everywhere isn’t always the right call. On the site’s home page, for instance, breadcrumbs usually don’t make sense — the user hasn’t traveled any path yet, so all you get is a lone “Home” link that’s neither pretty nor useful.
If you’d rather that didn’t happen on your home page, you can place the code in the page.php file instead of header.php. This file handles your site’s pages (like the cart page, contact page, and so on), and the best place for the code is usually right after get_header. In other words, look for the get_header() line and put the breadcrumb code right after it.

That way, breadcrumbs appear on your pages while your home page stays clean and uncluttered.
Now that we’ve grabbed the code and learned where to put it, in the next section we’ll look at how to display that same code in a neater, better-looking way.
Styling Your Breadcrumbs
So far we’ve added breadcrumbs to the site and they’re showing up. But you might notice they’re a bit stuck to the edge of the page, or not lined up with the rest of the content, and it looks a little off. Here’s a simple trick that makes things more professional.
Most themes have something called a container — a box that holds the site’s main content and keeps everything neat and centered on the page. What you can do is place the breadcrumb code inside that same container so it aligns with the rest of the page’s content.
For example, in some themes this container has a specific class name — something like site-container or main-container. You put the breadcrumb code inside that box, and that’s it — your breadcrumb trail lands in the right spot and displays nicely aligned with the rest of the page.
Just keep in mind that the name and structure of this container differ from one theme to the next. If you don’t know which element is your theme’s container or what it’s called, the best move is to ask your theme’s developer or support team. They’ll tell you exactly where to put the code.
This step is completely optional. If your breadcrumbs already display correctly and neatly, there’s no need to bother with it at all. But if you’re after a cleaner, more professional result, it’s worth the extra step.
In the next section, we’ll tackle a slightly trickier situation: when your theme doesn’t have a plain single.php file and we have to dig a little deeper.
When Your Theme Has No single.php File
So far we’ve worked with pages (page.php). But you probably also want breadcrumbs to show up on your site’s posts — that is, your articles and blog entries. The file for posts is usually single.php, and logically that’s where we’d put the code.
There’s a wrinkle here that might trip you up at first, though: some themes — especially the more professional, modern ones — don’t have a plain, straightforward single.php file. That is, when you open it, you’ll notice the main code isn’t there, and there seems to be no sign of get_header and the like. Don’t worry — this is completely normal.
The reason is that, to stay more organized, these themes break their code into pieces and tuck it away in a separate folder. This folder is usually named template-parts. In other words, the main single.php file is just a pointer that says, “go fetch the real content from such-and-such file in the template-parts folder.”
So what we need to do is head into that folder and find the right file.
From the same Appearance › Theme File Editor path, look for the template-parts folder in the file list.
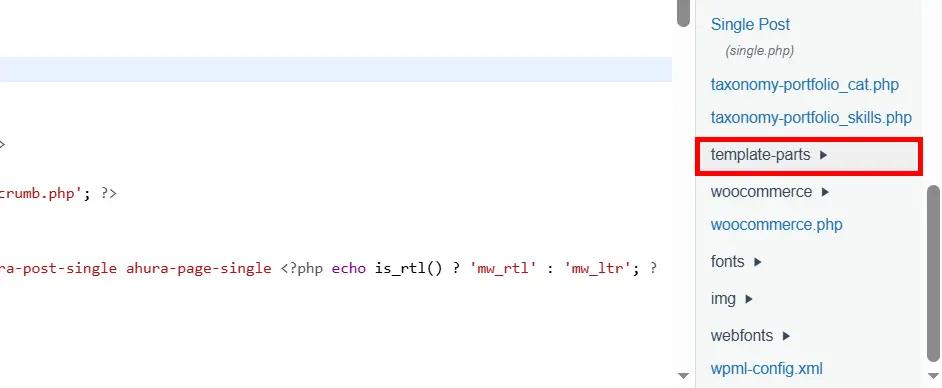
Inside it, you’ll usually see a few files with names like these:
single-1.phpsingle-2.phpsingle-3.php
Now the question is: which one? The thing is, a theme might use several different layouts for displaying posts, and each of these files corresponds to one of those layouts. Usually the default is number one (single-1.php). So it’s best to start there and put the breadcrumb code after get_header in single-1.php.
Then open one of your site’s posts and see whether the breadcrumb showed up. If it did, great — you’re done. If it didn’t, that means your theme is using a different single file (number 2 or 3, say); just go to that one and put the same code there to fix it.
The exact path to these files differs from one theme to the next. If you’ve searched and can’t find it, or you’re not sure which file is the right one, don’t hesitate to ask your theme’s support or developer. This is something they know precisely and can point you to quickly.
In the next section, I want to share a small but important note about PHP coding — the very thing that, if you don’t observe it, could land you with an error page instead of a breadcrumb.
The category.php File
Now let’s move on to categories. You might want breadcrumbs to appear at the top of the page when a user enters a category (like “WordPress Tutorials”), just like a lot of professional sites do. The file for categories is category.php, and that’s where we need to put the code.
Up to this point it’s just like before: you open the category.php file from the theme editor and place the code after get_header. But there’s a technical detail here that, if you’re not careful, might cause your site to show an error page instead of a breadcrumb. Let me explain it simply.
The Problem That Comes Up
In WordPress files, PHP code sits between two markers: it opens with <?php and closes with ?>. Anything between those two is treated as PHP.
Here’s where the problem lies: in some files, like category.php, that get_header line is inside an open PHP block that hasn’t been closed yet. In other words, you’re working in the middle of an open PHP block. If you drop in the breadcrumb code — which is itself a complete piece of PHP — right in the middle of this block, PHP gets confused, because one piece of PHP code can’t sit directly inside another. The result is that error page.
The Solution
What you need to do is first close the current PHP block, then insert your breadcrumb code, and then open a new PHP block again so the rest of the file doesn’t break. Like this:
php
?>

<!-- put the breadcrumb code here -->

<?php
In plain terms: you close the door with ?>, drop in your code, and open the door again with <?php. That’s it. With that one small move, PHP stops getting confused and your breadcrumb displays properly.
Don’t worry if this part felt a bit technical. You don’t need to know PHP; you just need to remember this one rule: if you see that the spot where you want to place the code has an open, unclosed PHP tag, close it first, then reopen it after your code.
Now that we’ve added breadcrumbs to pages, posts, and categories, it’s time to spruce up their appearance. In the next section, we’ll style our breadcrumbs with CSS — with the help of a neat little AI trick.
Styling Breadcrumbs with CSS Using AI
So far we’ve added breadcrumbs to every part of the site and they’re working. But their appearance is probably still very plain and raw — an ordinary line with no color, no spacing, no particular character. In this section we’re going to give it some style and make it look good. The good news is that you don’t need to know CSS for this at all; we’ll let AI do the work for us.
Getting the breadcrumb’s HTML code
Go to one of your site’s pages where the breadcrumb is displayed. Right-click on the breadcrumb trail itself and choose Inspect. A panel will open showing you the page’s code. Find the part that corresponds to the breadcrumb, right-click on it, and choose Edit as HTML, then copy that entire chunk of HTML.
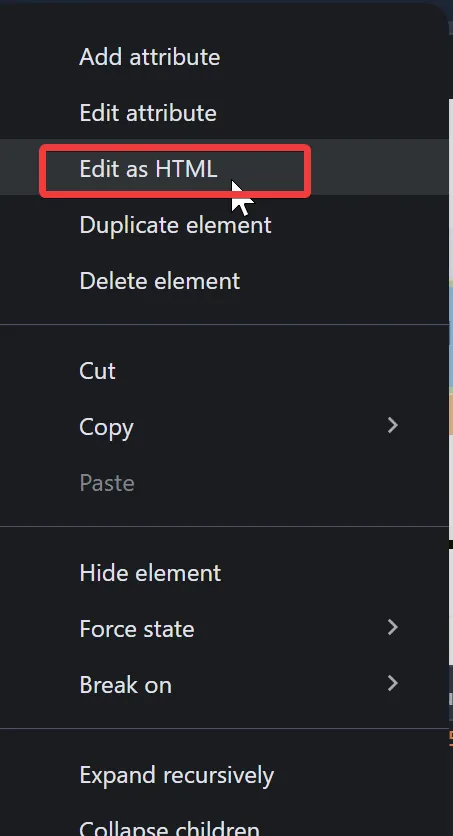
Don’t worry if this code makes no sense to you; you don’t need to understand it. Just copy it.
Asking the AI
Now head over to an AI tool like Claude or ChatGPT. Paste in the HTML code you copied and write a simple request, for example:
“This HTML code is the breadcrumb for my site. Write me a clean, nice-looking CSS style for it.”
The AI will look at the code and give you a few suggestions — a minimal, simple version, say, or one with a rounded gray box, or one with a colored background, and so on. Pick whichever you like best. It’ll usually recommend one option you can just go with.
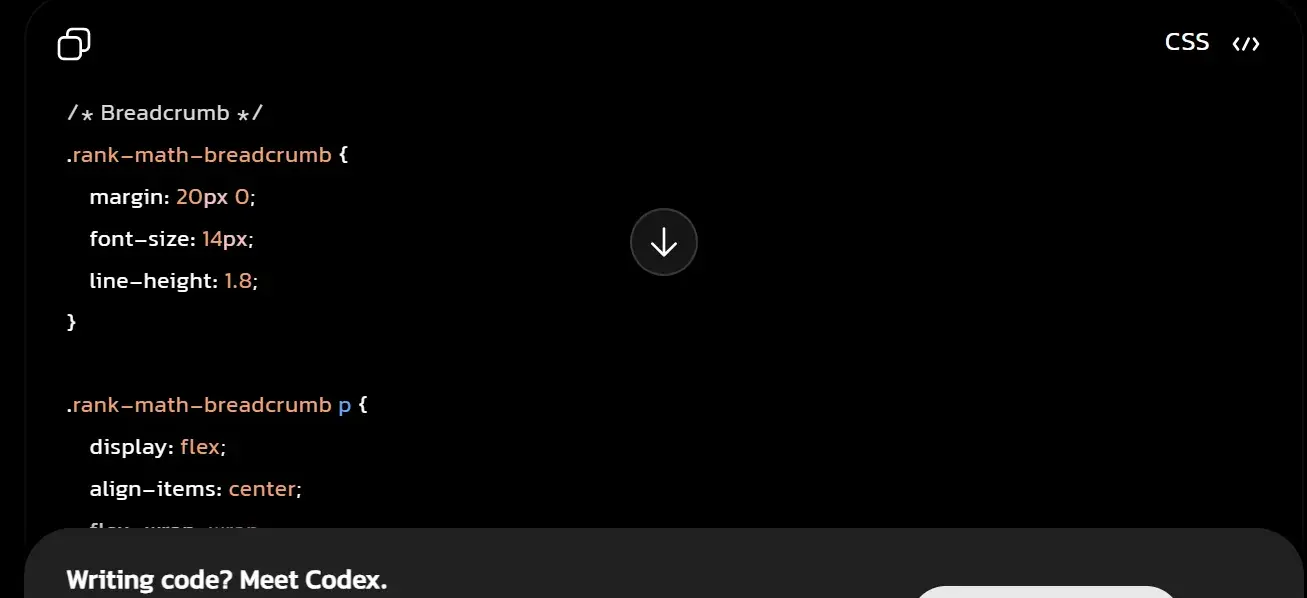
Placing the code
Now that you have the CSS code, you need to put it in the right place on your site. From your WordPress dashboard, go to:
Appearance › Customize › Additional CSS
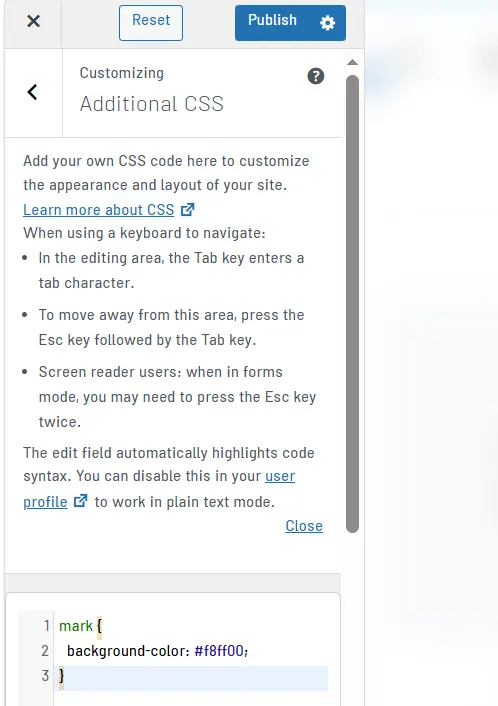
Paste the CSS code right here and hit Publish. Done. Now open one of your site’s pages and see how clean and professional your breadcrumb looks.
If you notice the breadcrumb is a bit cramped against the rest of the content with no breathing room, you can give it a margin in that same CSS — 20 pixels, for instance. That gives it a nice gap above, below, and around it, so it looks more spacious.
One friendly tip: when working with the AI, you can ask it to model the style on some well-known site to get a good idea, but try not to copy it exactly. It’s better for your site’s style to be your own and have its own independent identity.
In the next section, here’s some good news: some themes save you from all of this work entirely.
Professional Themes with Breadcrumbs Built In
Now that we’ve come this far and learned all the methods, let me share one more piece of good news: you might not need any of this at all!
Some professional, modern themes come with breadcrumbs built right in. That means you don’t have to install a plugin, grab code, go hunting for single.php, or wrestle with PHP. You just flip a switch in the theme’s own settings, and you’re done.
A good example is a theme called Ahura — one of those modern, all-in-one themes that bakes this feature right in. In its customizer, you can head straight to the post or page settings and turn on the breadcrumbs option. In the blog and single-post section, for instance, there’s an option that, once enabled, makes breadcrumbs appear above your articles automatically — without you writing a single line of code. It’s the kind of thing that saves you the whole plugin-and-code detour we just walked through.
And themes like this are usually updated and improved on a regular basis. Newer versions of Ahura, for example, come with a much cleaner, more complete panel for exactly this task, where you can fine-tune the style and display mode of your breadcrumbs with almost no effort. So if you haven’t updated in a while, a simple update might hand you a far nicer panel.
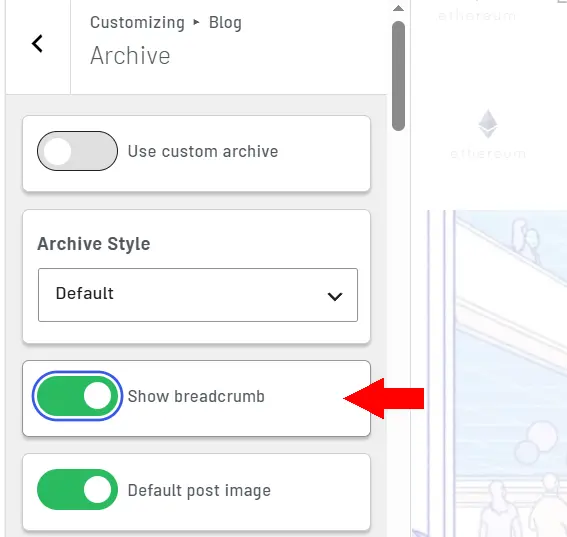
So if you’re using a professional theme, before you tangle yourself up with code and plugins, take a look at the theme’s own settings. This feature might be sitting right there waiting for you, and all you have to do is switch it on. And if you can’t find it or you’re not sure whether your theme has this option, ask the theme’s support; they’ll point you in the right direction quickly.
Wrapping Up
Well, we’ve reached the end of the road. By now you know exactly what a breadcrumb is and why that little line at the top of your pages is so useful — it keeps users from getting lost on your site and gives them a better experience, and it helps Google understand your site’s structure better and boosts your chances of being noticed.
Let’s take a look back at the path we traveled together. To add breadcrumbs to a WordPress site, you essentially have two routes:
The easy route: If your theme is one of those professional ones with the feature built in, all you have to do is switch it on in the theme settings. And if not, an SEO plugin like Yoast or Rank Math will get it up and running very quickly.
The manual route: If you wanted more control over the job, you learned how to grab the breadcrumb code and place it in the theme’s various files (like header.php, page.php, single.php, and category.php), how to observe that important rule about closing and reopening the PHP tag, and finally how to give it a clean, good-looking style with the help of AI.
As you can see, none of this was as hard as it seemed at first. All it takes is doing it once, patiently, to make your site tidier and more professional for good.
Now it’s your turn. Go to your site and get breadcrumbs up and running. If you get stuck anywhere or a question comes up, be sure to write it in the comments so we can help. Good luck! 🙂

Ahura WordPress Theme
The Power to Change EverythingElementor Page Builder
The most powerful WordPress page builder with 100+ exclusive custom elements.
Incredible Performance
With Ahura’s smart modular loading technology, files load only when they are truly needed.
SEO Optimized for Google
Every line of code is carefully aligned with Google’s algorithms and best practices.
To post a comment, please register or log in first.