
 Tutorials


 Ahura
Ahura Plugins

 Blog
BlogCreating a Weather on a the Website Using Vanilla JavaScript
- Tutorials
- Updated on

These days, adding dynamic and practical features to a website has become one of the main needs of every developer. One of these attractive and useful features is displaying real-time weather information for different cities to users. The good news is that to build something like this, you don’t need to use heavy and complex frameworks at all.
In this article, we’re going to teach you step by step how to build a complete weather application using only pure JavaScript (Vanilla JS) without any additional libraries. The user searches for the name of any city they want and instantly sees its current weather. In the end, you’ll have a lightweight, fast, and responsive tool that works perfectly on both mobile and desktop.
But there’s one important point that many other tutorials overlook: we won’t just stop at building the app. We’ll show you how to keep your API key secure (so no one can burn through your quota), and more importantly, how to add this application to your WordPress site — because after all, this is Mihan WordPress, and just writing code isn’t enough; you need to know exactly where to place it on your site so it works properly.
So if you want to build a truly practical application in the simplest way possible and launch it on your website, stay with us until the end of this article. We’ll explain all the code line by line, in a way that even if you’re a beginner, you won’t get stuck anywhere.
Table of Contents
What Are We Going to Build?
Before we roll up our sleeves and dive into the code, let’s see exactly what we’re going to build in the end. This way, you’ll know what to expect and it’ll be easier to understand what each piece of code is responsible for.
The application we’re building has two main sections. At the top of the page, there’s a search form where the user enters their city name and clicks the search button. Below that, there’s a section where the results are displayed as cards. Each card includes:
- The city name and country code (for example, London, UK)
- The current temperature in Celsius
- The weather condition (for example, “Mostly Cloudy”) along with an icon that matches the condition
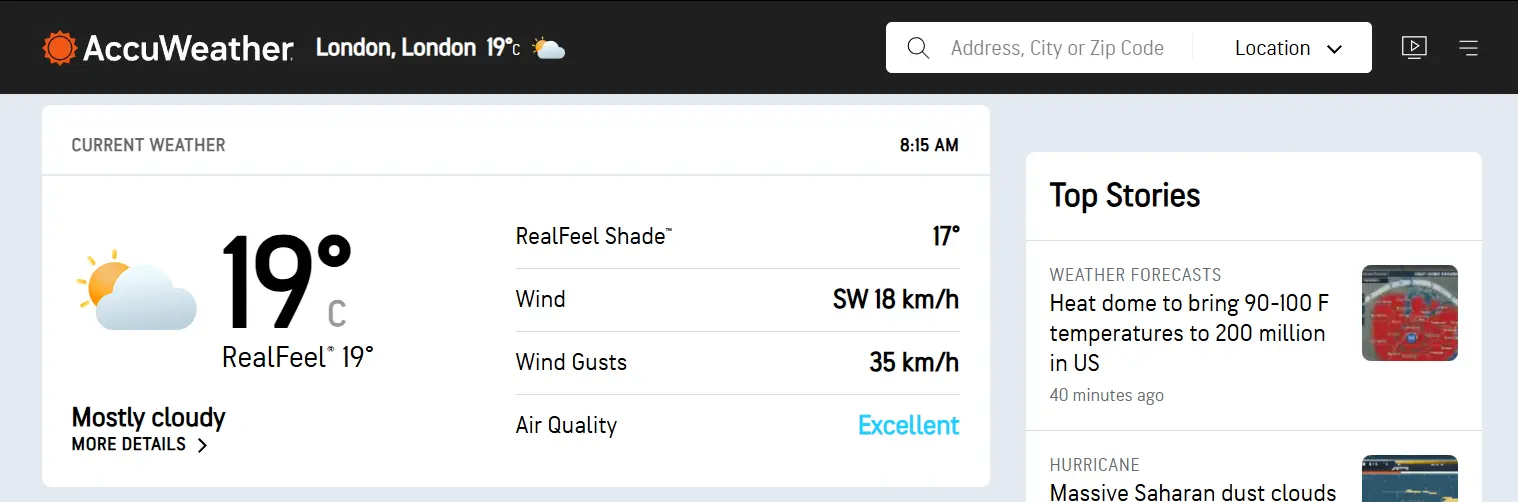
The interesting part is that the user can search for multiple cities one after another, and their cards will remain side by side. This makes it possible to compare the weather of several cities at the same time.
The entire application is responsive, meaning the card layout automatically adjusts to the screen size — multiple columns side by side on desktop, and a clean single-column layout on mobile.
Since we’re using vanilla JavaScript, the final result is lightweight and fast, without adding any unnecessary load to your website.
What Should You Know Before Starting?
Don’t worry — nothing complicated is required. You just need a basic familiarity with these three things:
- Basic HTML: Understand how tags and forms work.
- Basic CSS: Be familiar with classes and basic styling concepts.
- Basic JavaScript: Know what variables, functions, and events are.
If you’re not completely comfortable with these, that’s okay. We’ll explain everything step by step, and whenever we reach a new concept, we’ll clearly walk you through it.
Prerequisites for Building a Weather Application
Before we start coding, we need to take care of a few preliminary steps: obtaining a valid API key and preparing suitable icons to display weather conditions. Don’t worry—both are completely free and only take a few minutes.
Getting an API Key from OpenWeatherMap
The first and most important step is finding a weather service provider that gives us real-time data. Our recommendation is OpenWeatherMap—one of the most popular and reliable weather APIs in the world. Its free version is more than sufficient for building a standard application. To get your API key, follow these steps:
- Go to the OpenWeatherMap website and click on Sign Up.
- On the page that opens, enter the required information (a valid email address, username, and password).
- After confirming your email, log into your account and go to the API Keys tab.
- You’ll see a default key already generated for you; copy it and store it somewhere safe.
An important time-saving tip: A newly created key is not activated immediately. It may take up to one or two hours to become active. So if you encounter a 401 error (or an “Invalid API key” message) right away, don’t panic and don’t assume your code is wrong—just wait a bit and try again. This is one of the most common issues that confuses beginners.
About the free plan limitations: The free version of OpenWeatherMap allows 60 requests per minute and up to 1,000,000 requests per month. That’s more than enough for most small to medium-sized websites. If you later need more detailed data or a higher request limit, you can upgrade to a paid plan.
A clarification to avoid confusion: During registration, you might see a product called One Call API on the OpenWeatherMap website. Be aware that this is a separate product and requires adding a bank card for use. In this tutorial, we use the classic and free current weather endpoint (/data/2.5/weather), which requires no card and no complications—and it’s exactly what we need for this application.
Preparing Weather Icons
Another thing you need to build an attractive application is a good-looking set of icons. Fortunately, OpenWeatherMap provides an official icon set that you can use directly. The base URL for these icons looks like this:
https://openweathermap.org/img/wn/[Icone code]@2x.png
The icon code comes directly from the API response; for example, the code 01d means “clear sky during the day.” Using these official icons has several advantages:
- No need to download or host them separately.
- They are always up to date.
- They load quickly and reliably.
In your JavaScript code, we dynamically build the icon URL based on the code returned by the API and display it on the page.
For this tutorial, we recommend using the official icons because they are the simplest and fastest option. However, if you’re aiming for a more unique design, you can use other icon sets as well.
HTML Structure of the Weather App
Now that the prerequisites are ready, it’s time to start coding. First of all, we need to build the main skeleton of the page with HTML. Our structure is very straightforward and has two main sections:
- Top section (header and search form): This is where the app title, a form for entering the city name, and a small element for displaying error messages are placed.
- Bottom section (displaying results): This part is initially empty, and every time the user searches for a city, a new card is added to it.
An important point is that our form should not behave like regular forms; meaning that when the search button is clicked, the entire page should not refresh. Instead, we will prevent this default behavior using JavaScript and send the request in the background (via AJAX). We’ll handle that later in the JavaScript section; for now, let’s just build the skeleton.
The base HTML code looks like this:
<section class="top-banner">
  <div class="container">
    <h1 class="heading">Weather Application</h1>
    <form>
      <input type="text" placeholder="Search for a city name..." autofocus>
      <button type="submit">Search</button>
      <span class="msg"></span>
    </form>
  </div>
</section>

<section class="ajax-section">
  <div class="container">
    <ul class="cities"></ul>
  </div>
</section>
Let’s see what each part does:
- The top-banner section is the header at the top of the page that holds the search form.
- Inside the form, we have a text input where the user types the city name. The autofocus attribute ensures that as soon as the page loads, the cursor is automatically placed inside this field so the user can start typing without any extra clicks.
- The <span class=”msg”> element is where we display messages like “City not found.” It’s empty for now and only gets filled when necessary.
- In the bottom section, the <ul class=”cities”> tag is the container where city cards are dynamically added using JavaScript. It’s currently empty because no city has been searched yet.
That’s it! Our basic structure is ready. If you open this page in the browser now, you’ll see a simple form that doesn’t do anything yet. In the next sections, we’ll first style it (with CSS) and then bring it to life (with JavaScript).
Styling with CSS
Now that the skeleton is ready, it’s time to make the app look beautiful and user-friendly. We use modern CSS—meaning variables (Custom Properties), Grid, and responsive design. Our goal is for the app to display cleanly on all devices, from mobile to desktop.
Defining Variables and Resetting Styles
First, we define the main color variables. This way, if you want to change the colors later, you only need to modify them in one place and they’ll be applied everywhere:
:root {
  --bg_main: #0a1f44;
  --text_light: #fff;
  --text_med: #53627c;
  --text_dark: #1e2432;
  --red: #ff1e42;
  --darkred: #c3112d;
  --orange: #ff8c00;
}

* {
  margin: 0;
  padding: 0;
  box-sizing: border-box;
}

body {
  font-family: Tahoma, Arial, sans-serif;
  background: var(--bg_main);
  color: var(--text_light);
}
The first part (with the * selector) resets all the browser’s default margins and paddings to zero and sets the box model to border-box, so the app appears consistent across all browsers. For the font, we chose Tahoma because it displays Persian text clearly.
Styling the Top Section and Form
css.top-banner {
padding: 40px 0;
text-align: center;
}
.heading {
font-size: 2rem;
margin-bottom: 20px;
}
.top-banner form {
display: flex;
justify-content: center;
flex-wrap: wrap;
gap: 10px;
}
.top-banner input {
padding: 12px 16px;
border: none;
border-radius: 8px;
font-size: 1rem;
min-width: 250px;
}
.top-banner button {
padding: 12px 24px;
border: none;
border-radius: 8px;
background: var(--red);
color: var(--text_light);
font-size: 1rem;
cursor: pointer;
transition: background 0.2s;
}
.top-banner button:hover {
background: var(--darkred);
}
.top-banner .msg {
width: 100%;
margin-top: 10px;
color: var(--orange);
}Here we centered the form using flex and gave it a bit of spacing and rounded corners. The button, styled with the brand’s red color and a simple hover effect, has become more attractive.
Card Layout with Grid
Now we get to the interesting part. For arranging the city cards, we use CSS Grid, which is both powerful and flexible. With a simple trick, we make the number of columns automatically adjust based on the screen width:
.cities {
display: grid;
grid-template-columns: repeat(auto-fit, minmax(250px, 1fr));
gap: 20px;
list-style: none;
padding: 20px;
}
.city {
background: var(--text_light);
color: var(--text_dark);
border-radius: 12px;
padding: 20px;
position: relative;
overflow: hidden;
}
.city-name {
display: flex;
align-items: baseline;
gap: 6px;
}
.city-temp {
font-size: 2.5rem;
font-weight: bold;
color: var(--red);
}
.city figure {
display: flex;
align-items: center;
gap: 10px;
margin-top: 10px;
}
.city-icon {
width: 50px;
height: 50px;
}The magic line is here:
grid-template-columns: repeat(auto-fit, minmax(250px, 1fr));This single line tells the browser: “Each card should be at least 250 pixels wide, and place as many of them side by side as fit within the page width.” The result is that on a wide monitor you see multiple columns next to each other, fewer on a tablet, and on mobile it automatically switches to a single column — all without writing even a single media query. This one line handles the entire responsiveness for us.
JavaScript Coding and Fetching Data from an API
Now we reach the most exciting part: JavaScript. This is where our program transforms from a static page into a real, dynamic tool.
Step One: Selecting Elements and Listening to the Form
The first task is to select the required HTML elements and add an event listener to the form. When the user clicks the search button, we prevent the form’s default behavior (which is refreshing the page) and read the input value:
const form = document.querySelector(".top-banner form");
const input = document.querySelector(".top-banner input");
const msg = document.querySelector(".top-banner .msg");
const list = document.querySelector(".ajax-section .cities");
const apiKey = "YOUR_API_KEY_HERE";
form.addEventListener("submit", e => {
e.preventDefault();
const inputVal = input.value.trim();
// If the user hasn’t entered anything
if (!inputVal) {
msg.textContent = "Please enter a city name";
return;
}
// Continue the process...
});The e.preventDefault() line is what prevents the page from refreshing. The input.value.trim() removes any extra spaces at the beginning or end of the text, so if the user accidentally adds a space, it won’t cause any issues.
Step Two: Preventing Duplicate Searches
Before sending the request, it’s better to check whether this city is already in the list. If it is, there’s no need to send another request—we simply notify the user. This prevents duplicate cards and avoids wasting the API quota:
const listItems = list.querySelectorAll(".city");
const listItemsArray = Array.from(listItems);
if (listItemsArray.length > 0) {
const filteredArray = listItemsArray.filter(el => {
let content = "";
content = el
.querySelector(".city-name span")
.textContent.toLowerCase();
return content == inputVal.toLowerCase();
});
if (filteredArray.length > 0) {
msg.textContent = "This city has already been added";
input.value = "";
return;
}
}Step Three: Sending the Request to the API
Now it’s time to send the request. We use the Fetch API, which is a modern Promise-based method for making AJAX requests. We build the URL using the city name, the API key, and the Celsius unit (metric):
const url = `https://api.openweathermap.org/data/2.5/weather?q=${inputVal}&appid=${apiKey}&units=metric`;
fetch(url)
.then(response => response.json())
.then(data => {
// We process the data here
})
.catch(() => {
msg.textContent = "Error communicating with the server. Please check your internet connection";
});There is an important technical point here that many tutorials get wrong: you might think that when a user searches for an invalid city, the error will be caught in .catch(). But that’s not the case! When a city is not found, OpenWeatherMap returns a successful response that contains a 404 code inside it. This means .catch() only handles real network errors (like a lost internet connection), not a “city not found” case. So we need to check the data itself. In the next step, we’ll fix this properly.
Step Four: Proper Error Handling and Displaying the Result
Now inside the .then(data => {...}) block, we proceed like this: first we check the response code. If it’s 404, it means the city was not found and we show an appropriate message; otherwise, we extract the data and create the card:
.then(data => {
// If the city was not found
if (data.cod === "404" || data.cod === 404) {
msg.textContent = "Please search for a valid city";
return;
}
// Extract the required data
const { main, name, sys, weather } = data;
const icon = `https://openweathermap.org/img/wn/${weather[0].icon}@2x.png`;
// Create a new card
const li = document.createElement("li");
li.classList.add("city");
const markup = `
<h2 class="city-name" data-name="${name},${sys.country}">
<span>${name}</span>
<sup>${sys.country}</sup>
</h2>
<span class="city-temp">${Math.round(main.temp)}<sup>°C</sup></span>
<figure>
<img class="city-icon" src="${icon}" alt="${weather[0].description}">
<figcaption>${weather[0].description}</figcaption>
</figure>
`;
li.innerHTML = markup;
list.appendChild(li);
// Clear the input and error message
msg.textContent = "";
input.value = "";
})Let’s see what happened here:
- First, we checked with
data.codwhether the city was found or not. We fixed that well-known bug right here. - Then, using a trick called Destructuring, we extracted the four things we needed (
main,name,sys,weather) all at once from the data. - We built the icon URL dynamically based on the code returned from the API.
- We created a new
<li>element, structured its content using a Template Literal, and finally added it to the list withappendChild. - We also used
Math.roundto round the temperature, so instead of showing something like 24.56, it displays 25.
That’s it! Now if your key is active and you search for a valid city, the first weather card will appear on the page.
Storing Cities with localStorage
So far our app works, but it has one problem: every time the user refreshes the page or closes and reopens it, all the cities they had searched for are cleared and they have to start over. Let’s fix that.
The solution is to use localStorage; a small storage space in the user’s browser that keeps data even after the page is closed. The idea is simple: every time a city is added, we store its information in localStorage, and every time the page loads, we render the saved cities again.
Step One: Create an Array to Store Cities
First, we create an array to keep the list of cities. If something has already been saved in localStorage, we read that; otherwise, we start with an empty array:
let savedCities = JSON.parse(localStorage.getItem("cities")) || [];
The JSON.parse is necessary because localStorage can only store text (strings), so when reading the data we need to convert it back into an array. The || [] means “if nothing was stored, return an empty array.”
Step Two: Save a New City
Now we write a function that adds a city to the array and then stores the entire array again in localStorage:
function saveCity(cityData) {
savedCities.push(cityData);
localStorage.setItem("cities", JSON.stringify(savedCities));
}
Here, unlike before, we use JSON.stringify to convert the array into text so it can be stored.
Now, in the same place where we were creating the card (inside .then), after extracting the data, we just need to call this function and pass it the required information:
saveCity({
name: name,
country: sys.country,
temp: Math.round(main.temp),
icon: weather[0].icon,
description: weather[0].description
});
Step Three: Display Saved Cities When the Page Loads
Now we need to make sure that when the user opens the page, their previous cities are automatically displayed. For this, we write a function that reads the array and creates a card for each city. Since we use the card-creation code in two places (for new searches and for saved cities), it’s better to move it into a separate function to keep our code clean:
function renderCity(city) {
const li = document.createElement("li");
li.classList.add("city");
const iconUrl = `https://openweathermap.org/img/wn/${city.icon}@2x.png`;
li.innerHTML = `
<h2 class="city-name" data-name="${city.name},${city.country}">
<span>${city.name}</span>
<sup>${city.country}</sup>
</h2>
<span class="city-temp">${city.temp}<sup>°C</sup></span>
<figure>
<img class="city-icon" src="${iconUrl}" alt="${city.description}">
<figcaption>${city.description}</figcaption>
</figure>
`;
list.appendChild(li);
}
// Display saved cities on page load
savedCities.forEach(city => renderCity(city));
The last line (forEach) is what performs the magic: as soon as the page loads, it loops through all saved cities and creates a card for each one.
A small tip: After these changes, it’s better to replace the card-creation code in the search section with this same renderCity function so your code isn’t duplicated. This way it’s cleaner, and if you later want to change the card’s appearance, you only need to update it in one place.
With this, your app now has memory and remembers the user’s favorite cities.
Security: Why Shouldn’t You Put the API Key in the Browser?
Up to this point, our application is complete and working. But there’s an important issue that many tutorials don’t mention at all—and if you ignore it, it may cause trouble later. Let’s be honest: in the code we’ve written so far, we placed the API key directly inside the client-side JavaScript (that const apiKey = "..." line).
What’s the problem? Anything that exists in browser-side JavaScript is visible to everyone. Anyone can simply right-click on your page, open the browser’s Sources section or the Network tab, and easily find your key. That’s why the API key must be stored on the server side, not inside code sent to the browser. Anyone who reads the source can extract it and use your key—burning through your free quota or even generating costs for you.
So what’s the solution?
The main idea is simple: instead of the user’s browser talking directly to OpenWeatherMap, you place a middle layer (a proxy) on your own server. In other words:
- User’s browser → Your server → OpenWeatherMap
This way, the key stays only on your server and is never exposed to the user’s browser. The user communicates only with your server and has no idea what the key is.
A Simple Solution for WordPress Sites
The good news is that in WordPress, creating this intermediary is very easy, and you don’t need to set up a separate server. You just need to create a custom REST API endpoint that sends the request to OpenWeatherMap and returns the result. You can place the following code in your child theme’s functions.php file or use a plugin like Code Snippets:
add_action('rest_api_init', function () {
register_rest_route('myweather/v1', '/city/(?P<name>[a-zA-Z\s]+)', array(
'methods' => 'GET',
'callback' => 'get_weather_data',
'permission_callback' => '__return_true',
));
});
function get_weather_data($request) {
$city = sanitize_text_field($request['name']);
$api_key = 'YOUR_API_KEY_HERE'; // The key stays only here, on the server
$url = "https://api.openweathermap.org/data/2.5/weather?q={$city}&appid={$api_key}&units=metric";
$response = wp_remote_get($url);
if (is_wp_error($response)) {
return new WP_Error('weather_error', 'Error retrieving data', array('status' => 500));
}
$body = wp_remote_retrieve_body($response);
return json_decode($body);
}Now, in your client-side JavaScript, instead of sending a request directly to OpenWeatherMap, you send a request to your own site’s endpoint:
const url = `/wp-json/myweather/v1/city/${inputVal}`;There is no longer any trace of the API key in the client-side code. The user communicates only with your website, and the key remains secure and hidden on the server.
When Is This Necessary?
If you’re just practicing and learning on your local machine, placing the key in JavaScript isn’t a big deal. But as soon as you plan to publish this application on a real, public website, you should definitely use this proxy approach. It’s a professional habit that prevents many potential problems.
Optimization: Caching Requests to Avoid Hitting the Limit
Remember we said the free version of OpenWeatherMap has a limit of 60 requests per minute? Under normal conditions and for a small website, you’ll probably never hit that ceiling. But if your site becomes popular or multiple users search for the same city at the same time, you might encounter a 429 error (meaning “Too Many Requests”). The solution to this problem is caching.
The idea is simple: weather is not something that changes every second. So there’s no need to send a new request to the API every time a user searches for a city. Instead, we store the result for a few minutes and, if the same city is searched again, we display the saved result. Since weather data changes slowly, caching is the most effective optimization; it’s enough to store the current status for a few minutes to comfortably stay under the rate limit.
If you’re using the same WordPress proxy method we mentioned earlier, the best place to implement caching is on the server side. WordPress provides a built-in tool called the Transients API that is designed exactly for this purpose. You just need to modify your server-side function like this:
function get_weather_data($request) {
$city = sanitize_text_field($request['name']);
$cache_key = 'weather_' . md5(strtolower($city));
// First, check if this city's result is already cached
$cached = get_transient($cache_key);
if ($cached !== false) {
return $cached; // Return the stored result without making a new request
}
$api_key = 'YOUR_API_KEY_HERE';
$url = "https://api.openweathermap.org/data/2.5/weather?q={$city}&appid={$api_key}&units=metric";
$response = wp_remote_get($url);
if (is_wp_error($response)) {
return new WP_Error('weather_error', 'Error retrieving information', array('status' => 500));
}
$data = json_decode(wp_remote_retrieve_body($response));
// Cache the result for 10 minutes
set_transient($cache_key, $data, 10 * MINUTE_IN_SECONDS);
return $data;
}Now let’s see what happened:
- First, we use
get_transientto check whether the result for this city has already been stored. If so, we return it and don’t call the API at all. - If not, we send the request and then store the result for 10 minutes using
set_transient. MINUTE_IN_SECONDSis a built-in WordPress constant that makes the code more readable (instead of writing 600 yourself).
With this small change, if 100 people search for “London” within 10 minutes, only one request is sent to OpenWeatherMap and the other 99 get their answers from the cache. It’s both faster and keeps you safely within the rate limit.
How Do We Add This App to WordPress?
Alright, now we’ve reached the question that was probably on your mind from the very beginning: “Where exactly do I put this code in my WordPress site to make it work?” This section is exactly about that. We’ll introduce three methods—from the simplest to the most professional—so you can choose the one that matches your skill level.
Method 1: Using the Custom HTML Block (The Easiest Way)
If you just want this app to appear on a specific page or post and are looking for the fastest solution, this method is for you.
Edit the desired page, add a new block of type Custom HTML, and paste the entire HTML code of the app into it. Then you can also add the CSS and JavaScript code in the same block using the <style> and <script> tags.
It’s simple and fast—but for larger projects, it’s not very organized.
Method 2: Using the Code Snippets Plugin
If you want your code to be more organized and easier to manage (especially the server-side PHP code we wrote for security), the best option is the Code Snippets plugin.
Install and activate this plugin. Now you can add the PHP code (the REST API endpoint and caching logic) as a separate snippet—without touching the functions.php file.
Its biggest advantage is that if your code has an error, the plugin prevents your site from breaking—unlike directly editing functions.php, where a small mistake can take your entire site down.
Method 3: Creating a Shortcode with wp_enqueue_script (Professional Method)
This is the best and most standard approach—especially if you want to display the app anywhere on your site with a simple command. The idea is to create a shortcode (like [weather_app]) that displays the app wherever you place it.
Add the following code to your child theme’s functions.php file or to the Code Snippets plugin:
function weather_app_shortcode() {
// Load CSS and JS files only when the shortcode is used
wp_enqueue_style(
'weather-style',
get_stylesheet_directory_uri() . '/weather/style.css'
);
wp_enqueue_script(
'weather-script',
get_stylesheet_directory_uri() . '/weather/script.js',
array(),
'1.0',
true // Load in footer
);
// Return the app's HTML structure
return '
<section class="top-banner">
<div class="container">
<h1 class="heading">Weather App</h1>
<form>
<input type="text" placeholder="Search for a city..." autofocus>
<button type="submit">Search</button>
<span class="msg"></span>
</form>
</div>
</section>
<section class="ajax-section">
<div class="container">
<ul class="cities"></ul>
</div>
</section>
';
}
add_shortcode('weather_app', 'weather_app_shortcode');For this method to work, simply place the style.css and script.js files inside a folder named weather in your child theme directory. Now, wherever you write [weather_app] (in any page, post, or even widget), the weather app will appear there.
An important point about this method is the use of wp_enqueue_style and wp_enqueue_script. These functions are the standard and correct WordPress way to load CSS and JS files. This means the files are loaded only when truly needed, won’t conflict with other scripts, and won’t hurt your site’s performance.
Final Recommendation: If you’re publishing your app on a live website, the best and most professional setup is combining Method 3 (shortcode) for display and the secure proxy method (explained in the security section) to protect your API key.
Final and Complete Code
Alright, we’ve reached the point where we put all the pieces together. In this section, I’ll provide the complete code for all three files so you can copy and use them directly. This version is client-side (with the key in JavaScript), which is great for practice and learning. If you plan to publish it, remember—according to the security section—to move the key to the server side.
HTML File (index.html):
<!DOCTYPE html>
<html lang="fa" dir="rtl">
<head>
<meta charset="UTF-8">
<meta name="viewport" content="width=device-width, initial-scale=1.0">
<title>Weather App</title>
<link rel="stylesheet" href="style.css">
</head>
<body>
<section class="top-banner">
<div class="container">
<h1 class="heading">Weather App</h1>
<form>
<input type="text" placeholder="Search for a city..." autofocus>
<button type="submit">Search</button>
<span class="msg"></span>
</form>
</div>
</section>
<section class="ajax-section">
<div class="container">
<ul class="cities"></ul>
</div>
</section>
<script src="script.js"></script>
</body>
</html>
CSS File (style.css):
:root {
--bg_main: #0a1f44;
--text_light: #fff;
--text_med: #53627c;
--text_dark: #1e2432;
--red: #ff1e42;
--darkred: #c3112d;
--orange: #ff8c00;
}
* {
margin: 0;
padding: 0;
box-sizing: border-box;
}
body {
font-family: Tahoma, Arial, sans-serif;
background: var(--bg_main);
color: var(--text_light);
direction: rtl;
}
.container {
max-width: 1000px;
margin: 0 auto;
padding: 0 20px;
}
.top-banner {
  padding: 40px 0;
  text-align: center;
}

.heading {
  font-size: 2rem;
  margin-bottom: 20px;
}

.top-banner form {
  display: flex;
  justify-content: center;
  flex-wrap: wrap;
  gap: 10px;
}

.top-banner input {
  padding: 12px 16px;
  border: none;
  border-radius: 8px;
  font-size: 1rem;
  min-width: 250px;
}

.top-banner button {
  padding: 12px 24px;
  border: none;
  border-radius: 8px;
  background: var(--red);
  color: var(--text_light);
  font-size: 1rem;
  cursor: pointer;
  transition: background 0.2s;
}

.top-banner button:hover {
  background: var(--darkred);
}

.top-banner .msg {
  width: 100%;
  margin-top: 10px;
  color: var(--orange);
}
.cities {
  display: grid;
  grid-template-columns: repeat(auto-fit, minmax(250px, 1fr));
  gap: 20px;
  list-style: none;
  padding: 20px;
}

.city {
  background: var(--text_light);
  color: var(--text_dark);
  border-radius: 12px;
  padding: 20px;
  position: relative;
  overflow: hidden;
}

.city-name {
  display: flex;
  align-items: baseline;
  gap: 6px;
}

.city-temp {
  font-size: 2.5rem;
  font-weight: bold;
  color: var(--red);
}

.city figure {
  display: flex;
  align-items: center;
  gap: 10px;
  margin-top: 10px;
}

.city-icon {
  width: 50px;
  height: 50px;
}
JavaScript File (script.js):
const form = document.querySelector(".top-banner form");
const input = document.querySelector(".top-banner input");
const msg = document.querySelector(".top-banner .msg");
const list = document.querySelector(".ajax-section .cities");
const apiKey = "YOUR_API_KEY_HERE";
// Read saved cities
let savedCities = JSON.parse(localStorage.getItem("cities")) || [];
// Function to create and display a city card
function renderCity(city) {
const li = document.createElement("li");
li.classList.add("city");
const iconUrl = `https://openweathermap.org/img/wn/${city.icon}@2x.png`;
li.innerHTML = `
<h2 class="city-name" data-name="${city.name},${city.country}">
<span>${city.name}</span>
<sup>${city.country}</sup>
</h2>
<span class="city-temp">${city.temp}<sup>°C</sup></span>
<figure>
<img class="city-icon" src="${iconUrl}" alt="${city.description}">
<figcaption>${city.description}</figcaption>
</figure>
`;
list.appendChild(li);
}
// Function to save city
function saveCity(cityData) {
  savedCities.push(cityData);
  localStorage.setItem("cities", JSON.stringify(savedCities));
}
// Display saved cities on load
savedCities.forEach(city => renderCity(city));
// Handle form submission
form.addEventListener("submit", e => {
e.preventDefault();
const inputVal = input.value.trim();
if (!inputVal) {
msg.textContent = "Please enter a city name";
return;
}
// Prevent duplicate city
const exists = savedCities.some(
city => city.name.toLowerCase() === inputVal.toLowerCase()
);
if (exists) {
msg.textContent = "This city has already been added";
input.value = "";
return;
}
const url = `https://api.openweathermap.org/data/2.5/weather?q=${inputVal}&appid=${apiKey}&units=metric`;
fetch(url)
.then(response => response.json())
.then(data => {
// Check for invalid city
if (data.cod === "404" || data.cod === 404) {
msg.textContent = "Please search for a valid city";
return;
}
const { main, name, sys, weather } = data;
const cityData = {
name: name,
country: sys.country,
temp: Math.round(main.temp),
icon: weather[0].icon,
description: weather[0].description
};
renderCity(cityData);
saveCity(cityData);
msg.textContent = "";
input.value = "";
})
.catch(() => {
msg.textContent = "Error communicating with the server. Please check your internet connection";
});
});
That’s it! Place these three files together (in a single folder), replace YOUR_API_KEY_HERE with your own API key, and open index.html in your browser. Your app is ready to use.
Frequently Asked Questions
Why isn’t my API key working and returning a 401 error?
The most common reason is that you just created the key. New OpenWeatherMap keys are not activated immediately and it may take up to one or two hours. So if your code is correct but you’re getting a 401 error, wait a bit and try again. Another possible reason is that you copied the key incorrectly (for example, an extra space was included). Copy it again directly from your dashboard.
Does OpenWeatherMap really remain free to use?
Yes. The free plan, with a limit of 60 requests per minute and one million requests per month, is free forever and more than sufficient for most small to medium-sized websites. Just note that the separate One Call API product requires a bank card; however, in this tutorial we used a free endpoint that does not require a card at all.
Is there an alternative that doesn’t require an API key?
Yes. If you don’t want to deal with getting an API key, you can use Open-Meteo. This service works for personal and testing projects without registration or a key and is a good option for beginners. However, its response structure differs from OpenWeatherMap, so you’ll need to adjust your data processing code accordingly.
How can I use the user’s location instead of manual search?
You can use the browser’s Geolocation API, which retrieves the user’s location (with their permission). Simply use navigator.geolocation.getCurrentPosition() to get the latitude and longitude, and instead of the q=city-name parameter, use lat and lon in the API URL. This way, as soon as the user enters the site, the weather for their city is shown automatically.
Why is server-side caching better than client-side caching?
Because client-side caching (such as localStorage) only works for that single user. But when you cache on the server, if 100 people search for the same city, only one request is sent to the API and the rest are served from the cache. This both increases speed and much more effectively prevents your API quota from being exhausted.
Conclusion
Congratulations! By this point, you’ve built a complete and professional weather application using only vanilla JavaScript. An application that displays real-time weather for any city in the world, stores users’ favorite cities in the browser’s memory, and works smoothly across all devices from mobile to desktop.
But what we did in this tutorial went beyond a simple app. We also learned several important concepts that many tutorials skip:
- We handled errors properly (especially the well-known “city not found” bug that isn’t caught in
.catch()). - We learned why you shouldn’t place your API key directly in the browser and how to protect it using a secure proxy in WordPress.
- By caching requests, we improved speed and avoided worrying about API limits.
- And most importantly, we learned how to truly add this application to a WordPress site using three different methods.
The great thing is that all the code we wrote is standard and based on modern JavaScript, without using any external libraries or frameworks. That makes your application lightweight, fast, and reliable.
From here on, you’re free to improve the app further: you can add the ability to remove each city with a button click, display multi-day forecasts, or automatically detect the user’s city using Geolocation. You can also customize the styling with your own brand colors.
We hope this tutorial was helpful and that you now have a professional weather tool on your website. If you get stuck anywhere or have any questions, ask in the comments section—we’ll be happy to help. Wishing you success! 🙂

Ahura WordPress Theme
The Power to Change EverythingElementor Page Builder
The most powerful WordPress page builder with 100+ exclusive custom elements.
Incredible Performance
With Ahura’s smart modular loading technology, files load only when they are truly needed.
SEO Optimized for Google
Every line of code is carefully aligned with Google’s algorithms and best practices.
To post a comment, please register or log in first.