
 Tutorials


 Ahura
Ahura Plugins

 Blog
BlogFixing the “Unable to Create uploads Directory” Error in WordPress
- Tutorials
- Updated on
Have you ever tried to upload a simple file—a photo or a PDF—something you may have done hundreds of times before, but this time instead of the file uploading, a red message appears in front of you: “Unable to create directory uploads. Is its parent directory writable by the server?”
Many people’s first reaction is to think their website is broken. But no, that’s not the case at all. This is one of those errors whose name sounds scarier than it really is. Behind it is usually something very simple: WordPress wants to create a folder to store your file, but the server doesn’t give it permission to do so. That’s it. And the good news is that it can almost always be fixed with one or two small adjustments.
In this article, we’ll start with the quickest solution—the one that works right away for most people. If it solves your problem, great. If not, we’ll move on together to more advanced methods further down. So let’s get started.
Table of Contents
Quick Answer Box: If You’re in a Hurry
If you don’t have time to read the entire article and just want to fix it quickly, try these three steps. In about 90% of cases, following these steps is enough:
1. Using FTP (such as FileZilla) or your hosting File Manager, go to the path public_html/wp-content/.
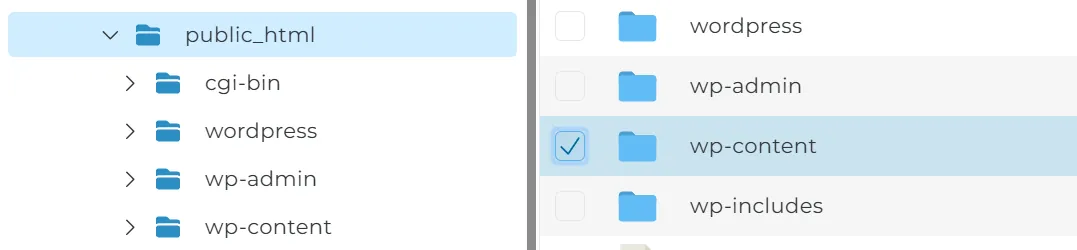
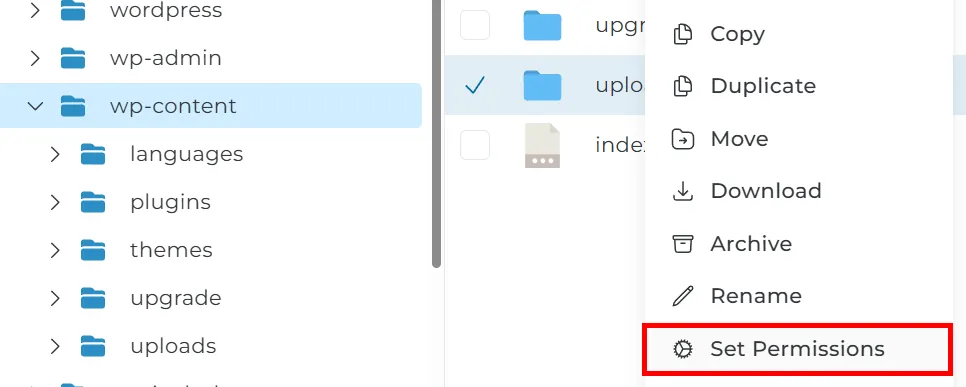
2. Right-click on the uploads folder and set its permission (Permissions / Chmod) to 755. If you don’t have an uploads folder at all, create it yourself and then apply 755 to it.
3. Go back to WordPress and try uploading again.
If it works, congratulations—your problem is solved. If you still see the same error, it means there’s another cause involved and we need to dig a little deeper. So stay with us until the end of this article.
What Does the “Unable to Create Uploads Directory” Error Mean and Where Does It Appear?
Before we jump into fixing it, it’s better to pause for a moment and see what WordPress is actually telling us with this message. Once you understand the root of the issue, choosing the right solution becomes much easier.
Here’s what’s going on: WordPress stores all the files you upload—everything from images and videos to PDFs—in a folder called uploads. This folder is located inside wp-content, and WordPress usually creates a separate subfolder for each month. Now, when you upload a file and that folder or its subfolder doesn’t exist, WordPress tries to create it automatically. But this is exactly where it hits a wall: the server tells it, “You don’t have permission to create a folder here,” and the result is the error message you’re seeing.
Now let’s take a closer look at the error message itself, because there’s an important clue hidden in it. The part that says, “Is its parent directory writable by the server?” (the same parent directory in the English version) points to a key detail: the problem isn’t necessarily with the uploads folder itself—it might be with the parent folder, meaning wp-content. This means that when troubleshooting, you shouldn’t focus only on uploads. As you’ll see when we get to the solutions, sometimes you also need to check the permissions of this parent folder.
This error usually appears in a few specific places: when you try to upload a new file in the Media Library, when setting a Featured Image for a post, or sometimes when a plugin or theme attempts to save a file on the server. No matter where it shows up, the root cause is the same—and so are the solutions we’ll cover next.
And let me reassure you: seeing this error does not mean your site has been hacked or your data has been lost. Your previous files are still in place, and your website continues to function; you just can’t upload new files for the moment. So there’s no need to stress—let’s move on to fixing it.
Why Does the Error Creating the Uploads Folder Occur? (5 Main Causes)
So far, we’ve learned that this error means WordPress was unable to create a folder because the server did not allow it. However, this “not allowing” can have several different root causes. If you know which category your problem falls into, you won’t need to blindly try every solution; you can go straight to the one that actually applies to you. Let’s review the five main causes together.
Incorrect Folder Permissions
This is the most common cause, occurring far more frequently than the others. On your hosting account, every folder and file has a set of numbers called “permissions” that determine who can read, write, or execute it. If this number is set incorrectly for the uploads or wp-content folder, WordPress is essentially blocked and cannot write anything there. The good news is that this common cause also has one of the simplest solutions, which we’ll explain in detail later.
Incorrect Folder Ownership on Private Servers
This issue mostly affects those whose websites are hosted on a VPS or a dedicated server. The situation is that on these servers, the web server (such as Apache or Nginx) runs under a specific user, usually named www-data. If the uploads folder belongs to a different user (for example, the one you use to connect via FTP), the web server will not have write access—even if all the technical settings are otherwise correct. In this case, the problem is not the permission number but the “ownership” of the folder.
Lost Upload Path After Site Migration
Have you ever moved your site from one host to another and then noticed that some things stopped working properly? This error can be one of those issues. Sometimes after migration, WordPress loses track of the exact uploads folder path or continues pointing to an old and incorrect path—one that doesn’t even exist on the new host. The result is an inability to create the folder and the familiar error message.
Hosting Disk Space Is Full
Many people underestimate this cause, but it does happen. If your hosting space is full, the server has no room left to create a new folder or store files, and naturally it cannot fulfill WordPress’s request. An important point is that this has nothing to do with the size of the file you’re uploading; the issue is the total hosting space being full. So if you’ve recently added a lot of files and content to your site, it’s worth checking how much space you have left.
Server Restrictions: open_basedir and SELinux
This last cause is a bit more technical and is mostly seen on specific servers or hosting environments with strict configurations. Some servers use tools like open_basedir or SELinux to restrict PHP access. This means that even if permissions and ownership are set correctly, the server itself may still block write access at a higher level. This cause is less common, but if you’ve tried all other solutions and still haven’t resolved the issue, these restrictions are likely involved—which we’ll address in the hosting support section.
How to Fix the “Unable to Create Uploads Directory” Error?
Alright, now we’ve reached the main part of the story. Below, we’ll go through several methods in order—from the simplest and fastest to the more advanced ones. I recommend starting with the first method and only moving on to the next if your issue isn’t resolved. Let’s dive in.
Method One: Set the uploads Folder Permission to 755 (The Fastest Way)
If you’re going to try just one solution first, this is it. This method is simple, secure, and for the vast majority of users, the problem is solved right here. What we want to do is tell the server, “Allow WordPress to write in this folder,” by setting a specific numeric value.
The magic number for the uploads folder is 755—the golden middle ground that allows WordPress to write while not leaving the door open to everyone. To set it, follow these steps:
1. Connect to your hosting: Use FTP (such as FileZilla) or the File Manager in your hosting control panel to navigate to the public_html/wp-content/ directory.
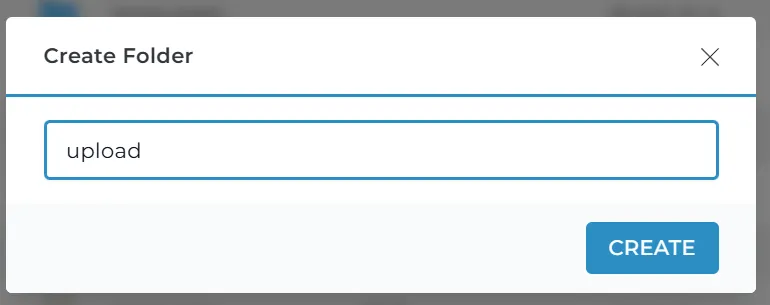
2. Find or create the folder: If you see the uploads folder, great. If not, create a new folder named exactly uploads (all lowercase).
3. Open the permission settings: Right-click on the uploads folder and select “File Permissions” or “Chmod.”
4. Enter 755: In the window that opens, enter 755. Make sure to check the “Recurse into subdirectories” option so the permission applies to all subfolders as well, then select “Apply to directories only” so this number applies only to folders (files have their own separate value, which is 644).
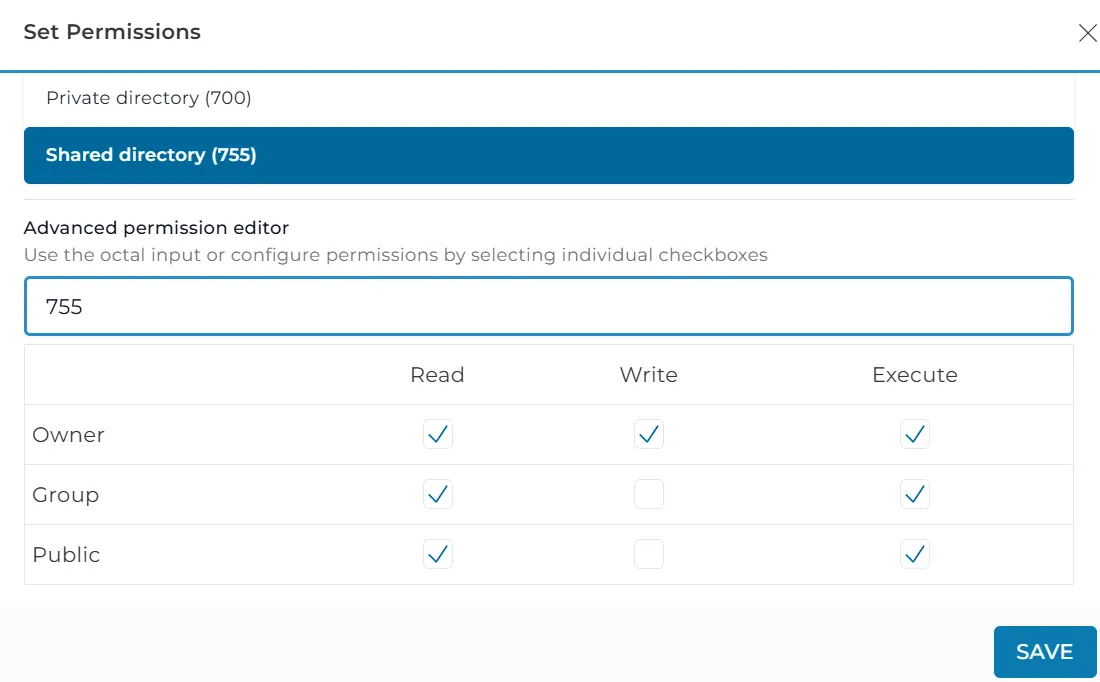
5. Test again: Click OK, return to WordPress, and try uploading again. Most likely, your issue will be resolved at this point.
Important Note: Check the Parent Folder (wp-content)
Remember at the beginning of the article when we said the error message refers to the “parent directory”? This is where that becomes important. If you set the uploads folder permission to 755 but still see the error—or if the uploads folder didn’t exist and WordPress couldn’t create it—the issue is likely with the wp-content folder itself.
Important warning: Never—let me emphasize, never—set folder permissions to 777 to solve this problem. It’s true that 777 fixes the error, but in reality, you’re throwing your site’s doors wide open to any attacker or malware. Setting it to 755 will do the same job while keeping your site secure.
The logic is simple: when WordPress tries to create the uploads folder, it must be able to write inside wp-content. If wp-content itself is not writable, then creating any subfolder inside it is naturally impossible. So just repeat the exact same steps you performed for uploads on the wp-content folder: set its permission to 755 and try again.
The Difference Between Shared Hosting and VPS at This Stage
There’s a point here that’s good to know, because if 755 doesn’t work for you, you won’t get confused. On shared hosting (the kind most websites use), PHP is usually executed under the same user that owns the files. That’s why setting the permission to 755 is almost always enough and resolves the issue.
However, if your site is on a VPS (Virtual Private Server) or a dedicated server, things are a bit different. In that case, the web server might run under one user (such as www-data) while the files belong to another user. In this situation, 755 alone won’t solve the problem, because the real issue is the “ownership” of the folder, not the permission number itself. If you’re in this category and this method didn’t work, don’t worry at all; we’ll fully explain your exact solution in Method Three (changing ownership via SSH).
Method Two: Manually Defining the Path in the wp-config.php File
This method is especially useful if you’ve recently migrated your site from one host to another and then encountered this error. As we mentioned in the causes section, sometimes after migration WordPress loses track of the uploads folder path. Here, we want to remind it of the correct path manually with a simple line of code so it stops searching for the wrong one.
Don’t worry about coding; all we’re doing is adding a single line to a file—nothing more. Let’s go through the steps together:
1. Locate the file: Go to your hosting File Manager or FTP software and look for a file named wp-config.php. This file is located in your site’s root directory—the same place where you see the wp-admin, wp-content, and wp-includes folders together.
2. Create a backup: Before making any changes, be sure to save a copy of this file on your computer. That way, if anything happens, you can easily revert to the original version. This is a golden habit you should never forget.
3. Open and edit the file: Open the file with a simple text editor (such as Notepad++). Then scroll to the end of the file and right before this line:
php
require_once(ABSPATH . 'wp-settings.php');Add this line of code:
php
define( 'UPLOADS', 'wp-content/uploads' );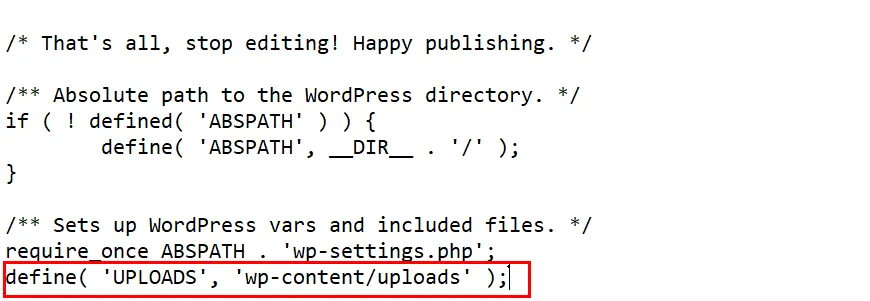
- Save and test: Save the file (and if you’re working with FTP, upload the edited version back to the host) and then return to WordPress and try the upload again.
Very often, this single short line is enough and the error disappears for good. Just keep one point in mind: this method is more of a solution for “fixing a missing path” rather than addressing the root cause of a permission issue. So if you see that it doesn’t work, it means the root of your problem is something else and we need to move on to the next method.
Method Three: Changing Folder Ownership via SSH (For VPS and Dedicated Servers)
You only need this method if your website is hosted on a Virtual Private Server (VPS) or a dedicated server and the previous methods did not work. As mentioned earlier, the issue here is usually not the permission number, but the ownership of the folder. This means the uploads folder belongs to one user, while the web server runs under a different user (usually www-data), and therefore does not have write permission. What we want to do is assign the folder ownership to the same user as the web server.
If you are not comfortable with the Linux terminal, do not worry at all. You can send these exact commands to your hosting support team and ask them to execute them for you. However, if you would like to do it yourself, follow these steps:
1. Connect via SSH: First, connect to your server using SSH (for example, with PuTTY or the Terminal).
2. Navigate to your site directory: Go to your website’s wp-content folder. The standard path is usually one of the following:
bash
cd /var/www/html/wp-contentOr, if your hosting structure is different:
bash
cd /home/username/public_html/wp-content3. Change folder ownership: Now use the following command to assign ownership of the entire uploads folder (and all its contents) to the www-data user:
bash
sudo chown -R www-data:www-data uploads4. Reset permissions: Finally, to be safe, set the permissions to 755:
bash
sudo chmod -R 755 uploadsAfter completing these steps, try uploading again. This time, it should work without any issues.
How can we find out which user the web server is running as?
An important point: the web server user is not always www-data. This name can vary depending on the type of server and how it is configured. For example, if you are using Nginx, your user might be nginx, or on some servers it could be something else. If you run the above command with the wrong user, not only will the problem remain unsolved, but you might even make things more complicated.
So it’s better to first make sure exactly which user your web server is running as. Simply run this command:
bash
ps aux | grep -E 'apache|nginx'In the output of this command, the first column shows the username that the web server is running under. Now that you’ve found the correct name, replace www-data with it in the chown command and rest assured that you’re assigning ownership to the right user.
Method Four: Using a Plugin to Automatically Set Permissions
You might be one of those users who doesn’t feel comfortable working with FTP and modifying system files, or you’re worried about making a mistake. That’s completely fine; fortunately, there are free plugins designed specifically for this task that handle the entire permissions setup automatically with just a few clicks. One of the most well-known and reliable options is the “Reset file and folder permissions” plugin.
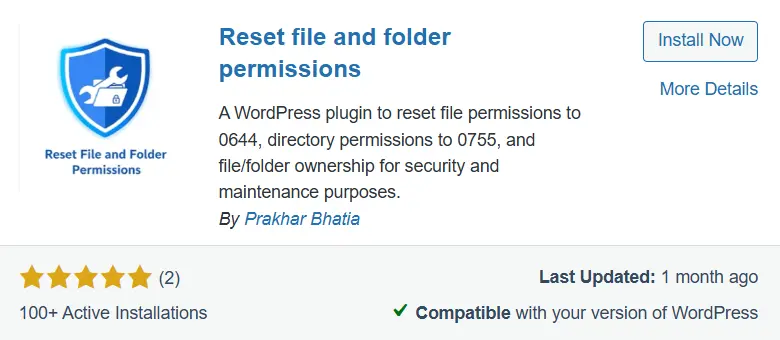
Here’s how to use it:
1. Install and activate: From your WordPress dashboard, go to Plugins > Add New, search for “Reset file and folder permissions,” then install and activate the plugin.
2. Go to the plugin settings: From the Tools menu, find and click on Reset Permissions.
3. Select the folder and run: Here, you can choose whether only the uploads folder should be processed or if all WordPress folders should be reset to their default state. After making your selection, click the Process Folders button.
Within seconds, the plugin sets all permissions to secure and standard values—755 for folders and 644 for files. This means you no longer need to worry about entering the wrong numbers.
A small recommendation: After you’re done using the plugin and the issue is resolved, you can deactivate it or even delete it entirely. The reason is that this plugin was only needed for a specific, temporary task. Keeping extra, unused plugins in the long run can slow down your site and increase security risks. So it’s best to keep your site lightweight and clean.
Method Five: Check Media Settings and the Upload Path in the Dashboard
This is one of those solutions that rarely gets mentioned, but sometimes it’s exactly what solves the issue—especially if you’ve migrated your site or manually changed its settings at some point. The point is that WordPress has a hidden place where it stores the upload path, and if that path is incorrect, no matter what you do with permissions, you’ll still get errors because WordPress is trying to access the wrong folder.
This setting was visible directly in the dashboard in older versions of WordPress, but in newer versions it’s usually hidden and you may need to dig a little to find it. Depending on your site’s situation, try one of the following two methods:
Case One: If the Upload Path Field Is Visible in the Dashboard
- Log in to your WordPress dashboard and go to Settings > Media.
- If you see a field called “Store uploads in this folder” or something similar, check its contents.
- If this field contains an incorrect or outdated path, either clear it completely (so WordPress reverts to its default path) or set it to the correct path: wp-content/uploads. Then save the changes.
Case Two: If This Field Is Not Visible in the Dashboard
In newer versions, this value is stored in the database under an option named upload_path. To review and fix it:
- From your hosting control panel, open phpMyAdmin and select your site’s database.
- Locate the wp_options table (the wp_ prefix may be different on your site).
- In this table, look for a row where the option_name column is set to upload_path.
- Check the value in the option_value column. If it contains an incorrect path, either clear it or set it to wp-content/uploads, then save the changes.
Reminder: Before making any changes to the database, be sure to take a backup (Export) of it. The database is the heart of your website, and it’s best to handle it with complete caution.
After correcting this path, try uploading again. If this was the root of your problem, it should now complete without errors.
Method Six: Contact Hosting Support and Check Error Logs
If you’ve made it this far and tried all the methods but the error is still there, don’t get discouraged. This likely means your issue is caused by something beyond your control and related to the server’s own settings. At this point, it’s time to either check the error logs yourself or hand the task over to those who have full access to the server—that is, your hosting support team.
First, Take a Look at the Error Log
The server usually records any errors that occur in a file called error_log, and this file can tell you exactly where the problem lies. It is typically located in the main hosting directory or inside the public_html folder. Open it and look for errors containing phrases like open_basedir or Permission denied. Seeing these phrases indicates that you’re dealing with a server-level restriction rather than a simple issue.
Then, Contact Your Hosting Support
If you find something in the log—or can’t make sense of it at all—the best course of action is to contact your hosting support. This is exactly where the quality and responsiveness of your hosting provider become important; good support can resolve this kind of error within minutes, while a weak provider might keep you waiting for hours. If you want to avoid such headaches from the start, at Mihan WordPress we have carefully reviewed and introduced the best WordPress hosting services; by reading the article “Best WordPress Hosting,” you can make a well-informed choice.
But instead of simply saying “my site isn’t working,” explain the issue clearly and technically so they can help you faster. For example, you can send them this message:
Hello, when uploading a file in WordPress, I encounter the error “Is its parent directory writable by the server.” Please check whether there are any restrictions on open_basedir, SELinux, or on directory creation and file writing by PHP. Also, please verify the ownership of the wp-content/uploads folder and correct it if necessary.
This message tells support exactly that you’re an experienced user and understand the issue; that alone makes them skip generic instructions and go straight to the core of the problem.
A Simple Trick That Sometimes Works Like Magic
And finally, a seemingly trivial but actually effective tip: sometimes a simple restart of server services (such as the web server or PHP), done by the support team, fixes everything. So if nothing specific is found, ask them to try this as well.
Summary Table: A Quick Comparison of All Solutions
If you want an overview of all the methods and quickly decide which one suits you best, this table will do the job.
| Method | Difficulty | Chance of Success | Time Needed | Suitable For |
|---|---|---|---|---|
| Setting permissions to 755 | Easy | Very high | About 1 minute | Everyone, especially shared hosting |
| Defining the path in wp-config.php | Easy | Medium | About 2 minutes | After migrating a site |
| Changing ownership via SSH | Advanced | High | About 3 minutes | VPS and dedicated server users |
| Using a plugin | Very easy | Medium | About 2 minutes | People who don’t work with files |
| Checking media settings | Easy | Medium | About 2 minutes | After migration or manual changes |
| Contacting hosting support | Very easy | High | Depends on support response time | When other methods haven’t worked |
My suggestion is the same thing I said from the beginning: start with the first row of the table—setting the permission to 755—and only move on to the next rows if necessary.
6 Golden Tips to Make Sure You Don’t Face This Error Again
Alright, you’ve fixed the error. But let’s take a few simple steps to make sure this uninvited guest doesn’t come back anytime soon:
- Cross out the number 777. You already know this, but it’s so important that it’s worth repeating. Never set folder permissions to 777 as a quick fix. Always stick to 755 for folders and 644 for files—these are the secure and correct standards you should follow.
- Have a regular backup system. Use a reliable plugin like UpdraftPlus to automatically back up your site. That way, if an error ever occurs, instead of stressing out, you can simply restore your site to the latest healthy version.
- Use professional tools when migrating your site. Many of these errors happen after a careless migration. Plugins like All-in-One WP Migration or Duplicator automatically configure paths and permissions correctly and prevent these kinds of issues.
- Keep everything up to date. Always update the WordPress core, your theme, and all your plugins. Sometimes upload errors stem from conflicts between outdated versions and newer servers, which can be resolved with a simple update.
- Pay attention to security plugins. If you use plugins like Wordfence, review their settings. Sometimes these plugins reset permissions to their default state for security reasons and unintentionally cause this error to reappear.
- Back up before making any technical changes. You may have read this sentence several times in this article, but it truly is the most important habit you can develop. Before touching files, the database, or server settings, take a full backup so you always have a way to restore your site.
Frequently Asked Questions
Is setting the permission to 777 dangerous?
Yes, it is very dangerous. Permission 777 practically means that any user on the internet can create, delete, or modify files in that folder. This leaves the door wide open for malware uploads and your site being hacked. It is only acceptable for a few seconds strictly for testing purposes, and only if you immediately revert it back to 755 afterward.
What should I do if I don’t have an uploads folder at all?
It’s very simple—create it yourself. In your FTP or hosting File Manager, go inside the wp-content folder and create a new folder with the exact name uploads (all lowercase). Then set its permission to 755. From then on, WordPress will automatically store files inside it.
Is this error caused by large file size?
No, these two issues are completely separate. The “Unable to create uploads directory” error is related to permissions and access rights. If the problem were due to file size, WordPress would display a completely different message, something like “The uploaded file exceeds the maximum allowed size.”
Why does the error return after some time?
If you fixed the error but it comes back, most likely a security plugin or an automated cron job is reverting the permissions to their previous state. Check the settings of your security plugins (such as Wordfence), or ask your hosting support to permanently correct the file ownership so the issue does not recur.
Will changing the PHP version fix the problem?
In rare cases, yes. Sometimes very old PHP versions (such as 5.6) are not fully compatible with newer servers and can cause such errors. If you are using an outdated version, trying a newer version like 8.0 or 8.1 from your hosting control panel won’t hurt.
If I don’t have SSH access, how can I change ownership?
There’s no need to worry. Simply ask your hosting support to do it for you. Just clearly tell them: “Please change the ownership of the wp-content/uploads folder to the www-data user (or the web server user).” This task only takes them a few seconds.
Conclusion
Well, we’ve reached the end of the road. Now you can see that this error wasn’t as scary as it seemed at first, right? Let’s review the path we need to take one last time.
The best place to start is setting the permission to 755 on the uploads folder (and, if necessary, the wp-content folder); it’s the simplest, safest, and most popular solution, and for most users, it resolves the issue right away. If that doesn’t work and you’ve recently migrated your site, try manually defining the path in wp-config.php or checking the Media settings. And if you’re on a VPS or dedicated server, the issue is likely related to folder ownership, which can be fixed with a few simple SSH commands. Finally, if none of these solutions work, your hosting support team is always there to help.
And never forget these three points: before making any changes, take a full backup; never set 777 permissions on folders; and always keep WordPress and your plugins up to date. These three simple habits will save you from many potential problems in the future.
We hope this article has helped you remove this error from your path once and for all. Now it’s your turn: which method worked for you? Or maybe you have another solution that we didn’t mention here? We’d be happy if you shared your experience with us and other users in the comments section. Wishing you success! 🙂

Ahura WordPress Theme
The Power to Change EverythingElementor Page Builder
The most powerful WordPress page builder with 100+ exclusive custom elements.
Incredible Performance
With Ahura’s smart modular loading technology, files load only when they are truly needed.
SEO Optimized for Google
Every line of code is carefully aligned with Google’s algorithms and best practices.
To post a comment, please register or log in first.