
 Tutorials


 Ahura
Ahura Plugins

 Blog
BlogReducing Video File Size Without Losing Quality Using One Free Program
- Tutorials
- Updated on

These days it’s rare to find someone who isn’t into watching or making videos. Many of us just keep videos sitting on our system or hard drive, until one day we realize there’s no space left and we have to keep deleting something to make room for something new.
Now, if you happen to be a YouTuber or content creator yourself, things get even more serious. The large file size of edited videos is a constant headache, and you’re always on the lookout for a way to cut that size down without ruining the quality of your work.
In this article, we want to teach you exactly that: how to reduce a video’s file size in six simple steps using a professional program called Handbrake, without letting its quality fall apart.
Table of Contents
What Is Handbrake?
The name of this program might not be familiar to many people, so let’s introduce it very simply. Handbrake is one of the most well-known programs that can shrink the file size of movies and videos in just a few minutes, and without any noticeable drop in quality. The nice thing about it is that, unlike many of its competitors, it doesn’t have a cluttered, confusing user interface, and working with it is genuinely easy.
Handbrake or Camtasia?
If you’ve spent a little time in the world of video content production and video marketing, you probably know that some programs in Handbrake’s class, like the well-known Camtasia, don’t support formats like MOV. That means many people who shoot video on their phones effectively can’t edit their work with Camtasia.
But Handbrake doesn’t have this limitation and easily supports MKV, webM, MP4, and MOV formats. Even more interesting, besides reducing the file size of any type of video, you can also change the file’s format, which is really handy.
Just keep one thing in mind: Camtasia is used for recording and editing screen captures, whereas Handbrake’s job is only format conversion and size reduction. So these two aren’t really competitors — each does its own thing.
Reducing Video File Size Without Losing Quality
If, like many people, you still haven’t gotten the hang of this program and don’t know how to reduce a video’s size while keeping its quality, don’t worry at all. From here on, we’ll go step by step together.
Step One: Download and Install Handbrake
The first thing you need to do is clear: download and install the program. The good news is that Handbrake is completely free and can be easily downloaded from its own official site.
After downloading, install it like any other program and run it. As soon as the program opens, you’ll see a screen where all the size-reduction work is going to happen.
Step Two: Importing Your Video into the Program
Here, with just a few simple clicks, you can import your video into the program. The easiest way is drag and drop; that is, you drag the file and drop it into the program.
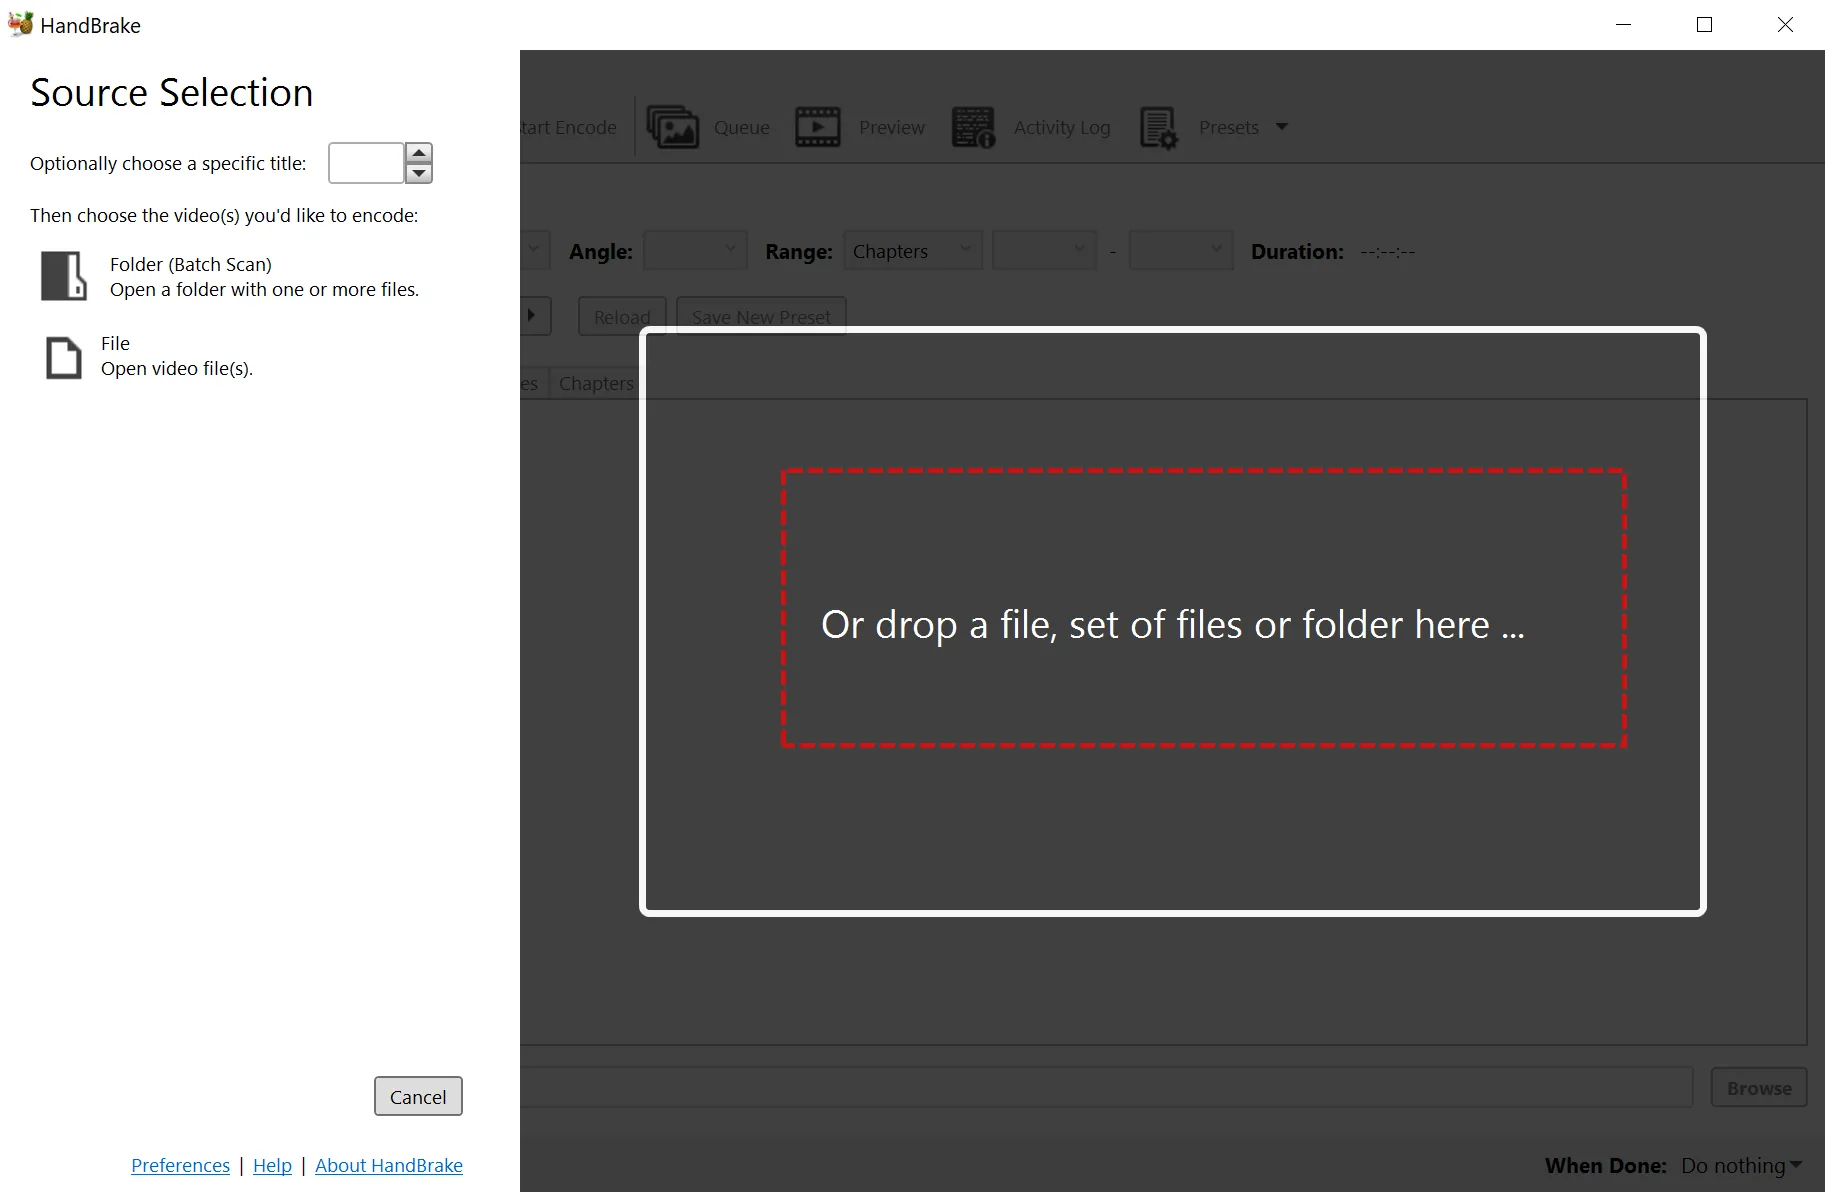
You have two other options too: you can either import all the videos inside a folder together as a batch, or select the video files one by one. Whichever is easier for your workflow.
Step Three: Initial Settings and Choosing Output Quality
Don’t underestimate this step. Here you need to apply a set of settings so that after the size is reduced, your video doesn’t turn out blurry and low-quality. If you breeze through it, rest assured you’ll regret it once you get the output.
To do this, go to the Presets section and, from the General tab, choose one of the output options. Our suggestion is to pick one of the two options marked in the image:
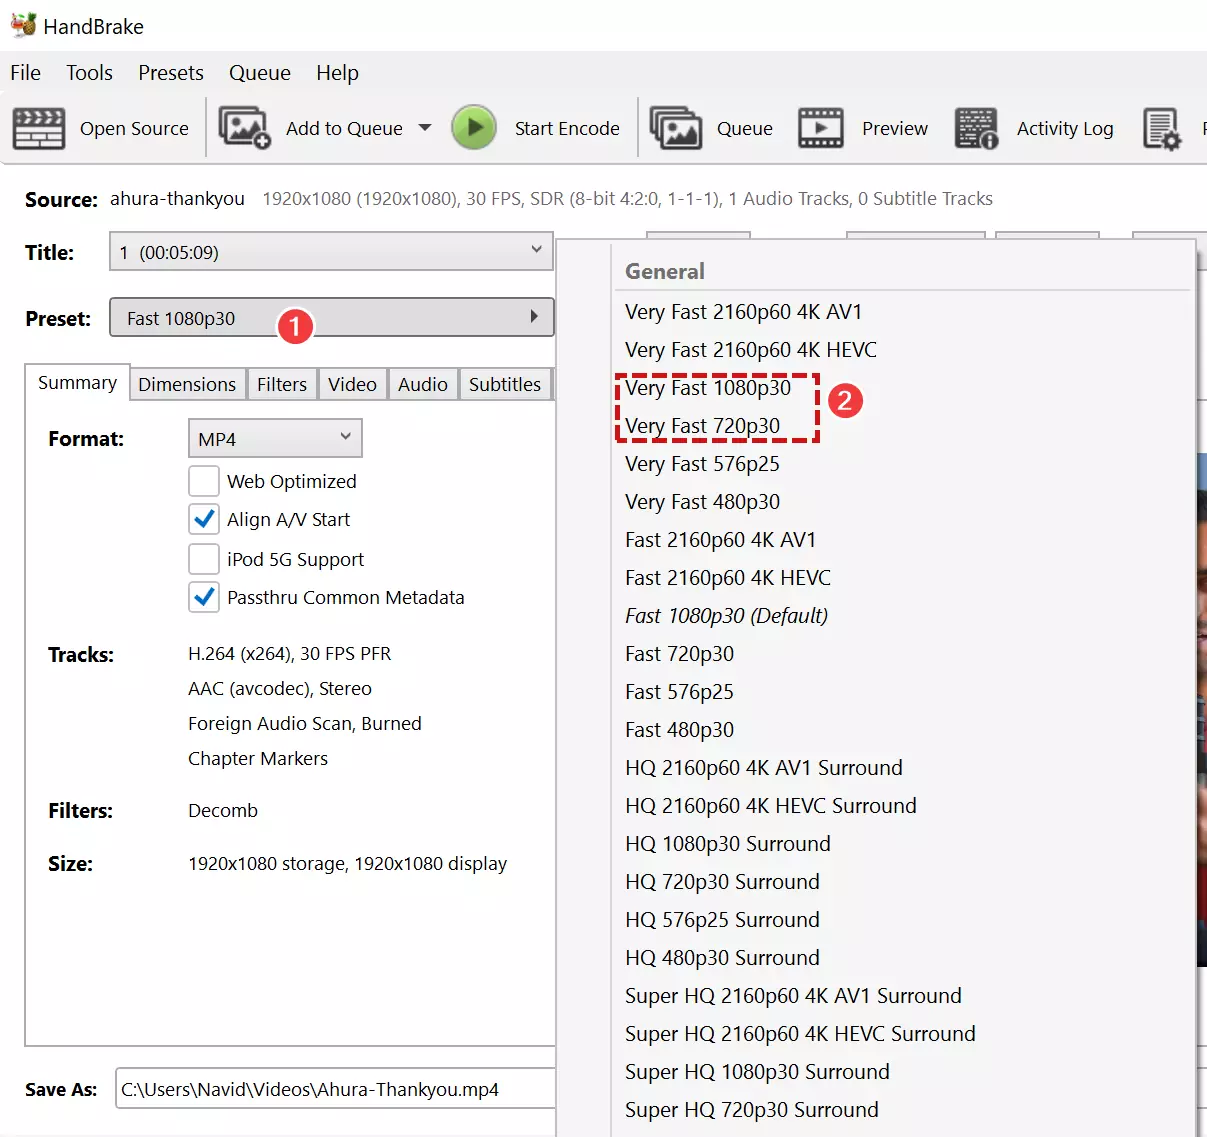
The first option is Very Fast 1080p30, which gives you the video at 1080p quality. The second option is Very Fast 720p30, which has acceptable quality. Now, which quality (1080p, 720p, 480p, and so on) is best for you depends on where you’re going to publish the video; Vimeo, YouTube, or any other platform.
Step Four: Fine-Tuning the Quality
If you think the job’s done, we have to tell you: not yet. In this step you’re going to set the video quality more precisely, and this is exactly where you’ll see this program’s magic.
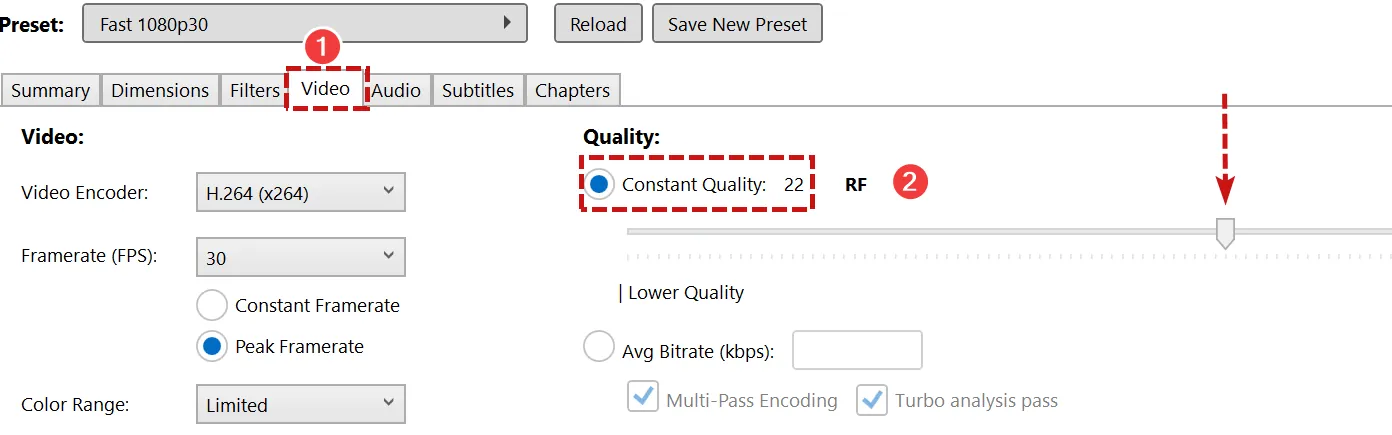
Go to the Video tab and then the Quality section. There, set the Constant Quality value to a number between 21 and 29. This range usually gives you a good balance between size and quality.
Step Five: Audio Settings
Now it’s the audio’s turn. Go to the Audio tab and set the Bitrate to 128. Why? Because in most videos recorded on a phone, the bitrate is above 160, and these high numbers are often what make a video’s size balloon unnecessarily.
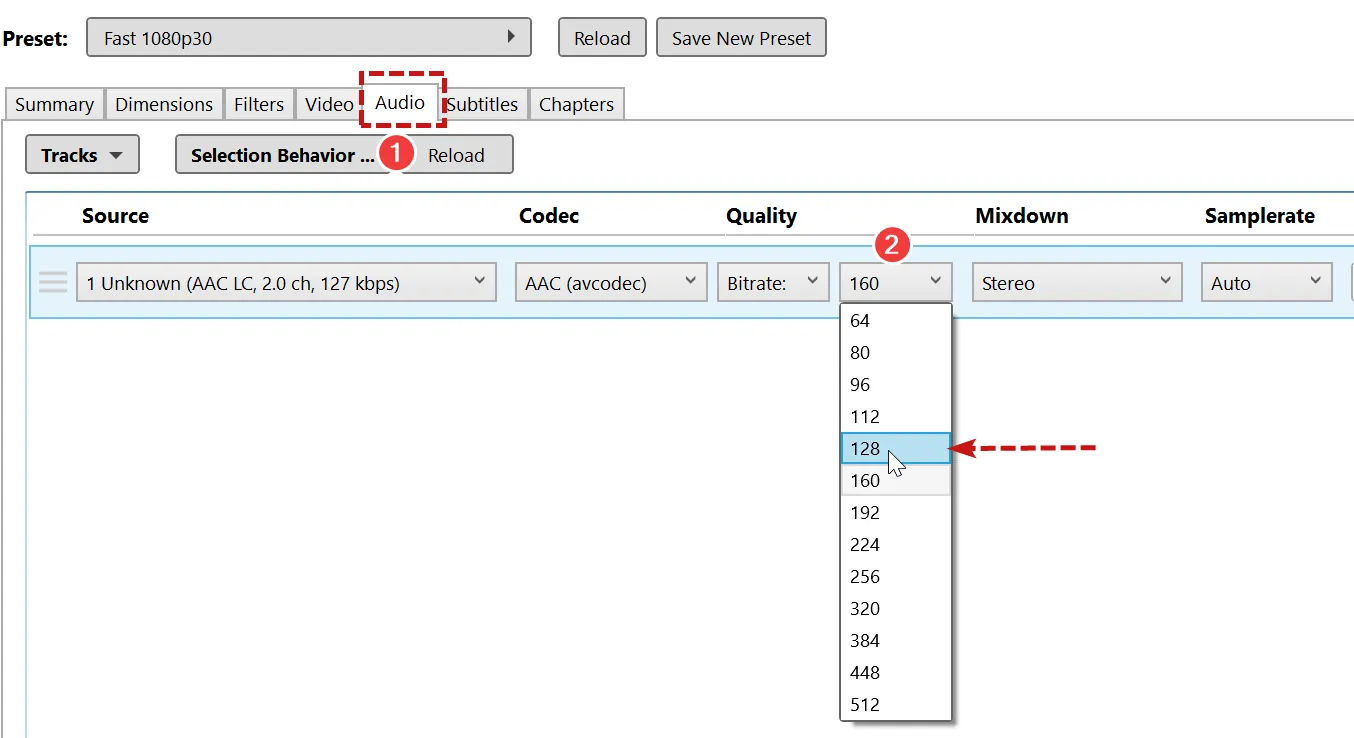
There’s one more thing you can do: set MixDown to Mono. In most instructional videos we don’t really need stereo sound, and this also helps shrink the size a bit.
Step Six: Choosing the Format and Saving the Final File
We’ve reached the last step. Here you just need to specify the video’s final format. The point to watch out for is that Handbrake outputs the file in m4v format by default, and you’re better off changing that to mp4.
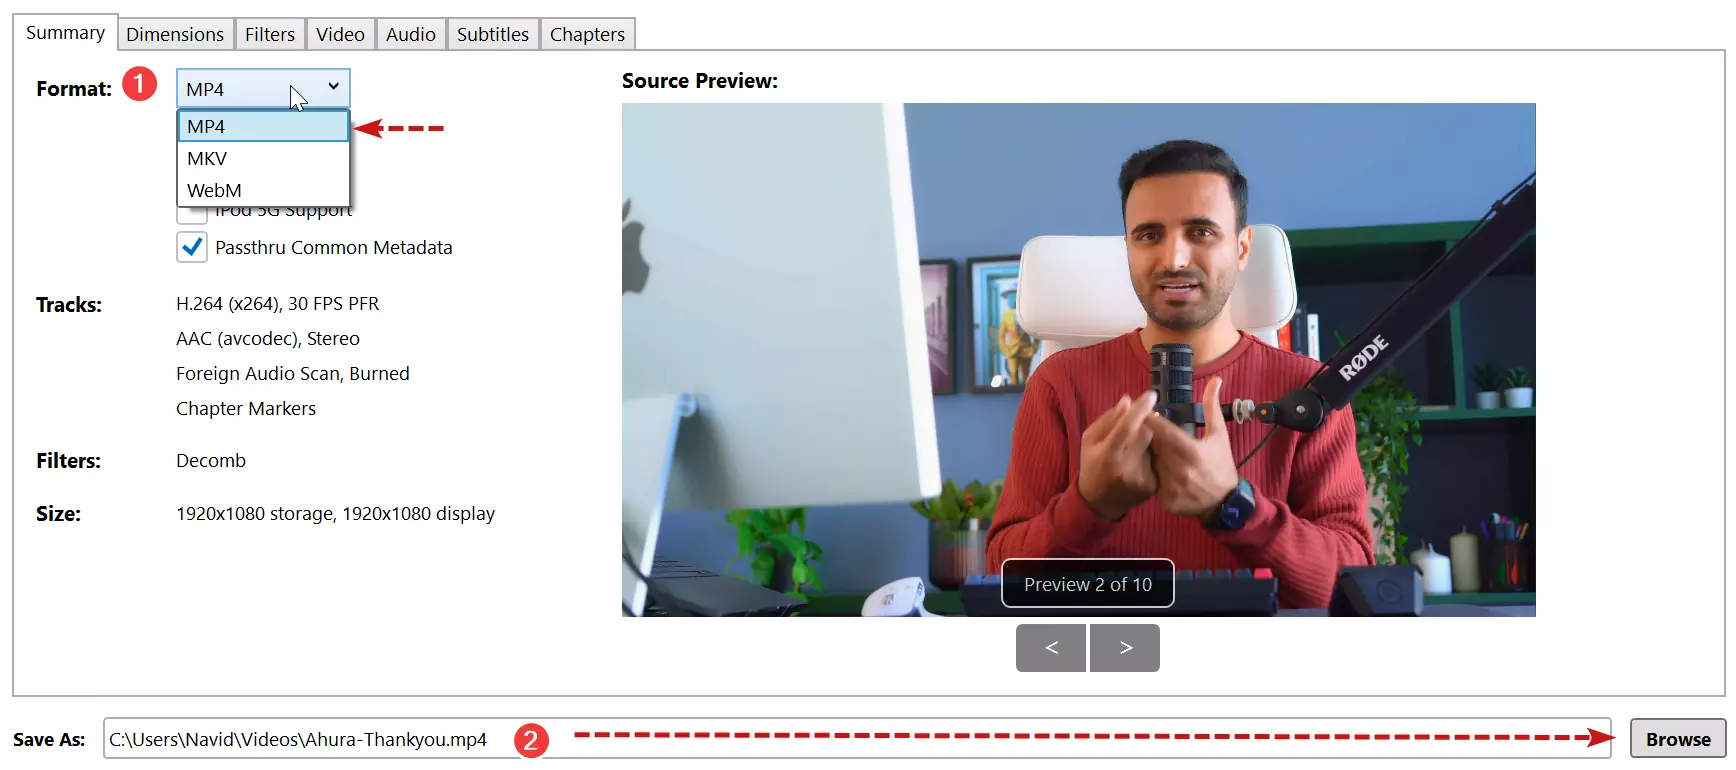
Finally, set the save location on your system or laptop and hit the Start Encode button.

Now just sit back, enjoy watching your video’s size shrink, and put these videos to use on your WordPress site! Good luck. 🙂

Ahura WordPress Theme
The Power to Change EverythingElementor Page Builder
The most powerful WordPress page builder with 100+ exclusive custom elements.
Incredible Performance
With Ahura’s smart modular loading technology, files load only when they are truly needed.
SEO Optimized for Google
Every line of code is carefully aligned with Google’s algorithms and best practices.

To post a comment, please register or log in first.