How to build a website with Google Sites
- WordPress Tutorials
- Updated on

Google Site is a Google service that allows its users to design a website for themselves. Building a site with Google Site is completely free. You do not need a host or domain to build a site this way, and also, working with this service is very easy and fast, and you will not need programming to build a site.
It is clear that Google Sites can not be considered a CMS or content management system because the features and access that a content management system like WordPress gives you are much more useful than the features of Google Sites. Anyway, maybe someone would like to try Google Sites, and we decided to teach you how to build a site with Google Sites.
Building a site on Google sites is not suitable for store sites, but if you want to promote your product or service, or share your opinions, ideas, and thoughts with others, or a teacher or professor to easily manage your classroom and Sharing materials and communicating with students can design a site. This Google service is beneficial for novice users who want to have a website for free. This article will teach you how to build a website with Google sites, so stay tuned until the end of the article.
Build a website with Google Sites
It is important to know what Google Sites is. Since Google Sites is a free service and you do not need to buy hosting, it is probably useful for those who want to have a simple blog. I have seen that a group of friends of the instructor has used Google site hosting to upload their course sessions to not pay for the purchase of the host.
But in my opinion, WordPress is still unrivaled and has the efficiency and quality of service in a real website. But if you do not want to spend anything on your site, it can be a good option.
Start building a website on Google
There are two ways to start building a site on Google Sites
- From the Google Apps section, select Google Drive, as shown below
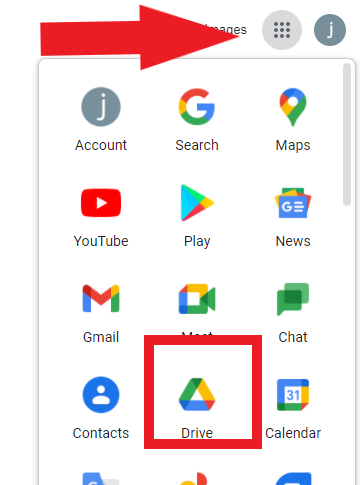
Then you will see the following page, and now you have to click on the new + button.
Then click on the more option and the google site option.
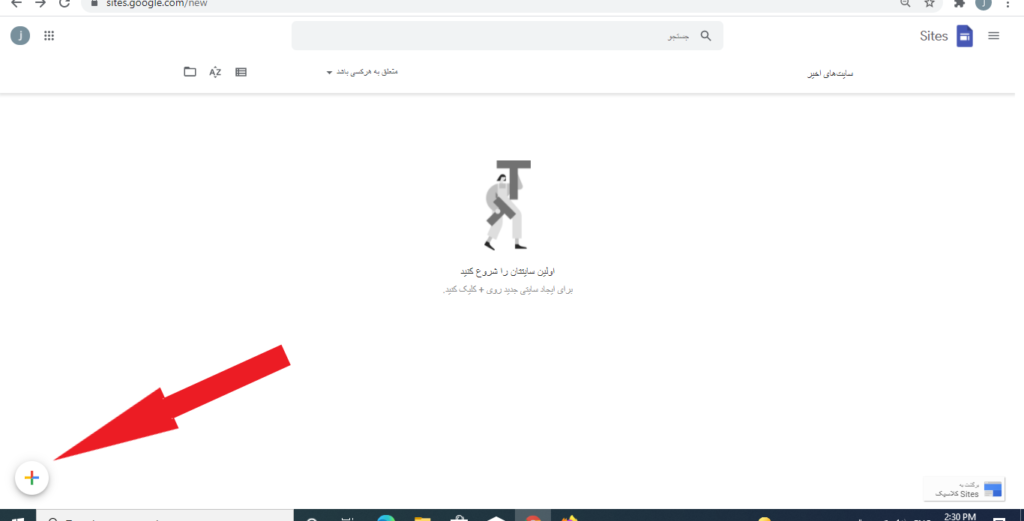
Or go to site.google.com, where you will see the following page in the image below, and click on the + sign to create a new site.
Of course, note that to build a site on Google, you must have a Gmail account and log in with your account.
Choose a name for your site
Once you have created your site, you will enter the editing environment of your site. Using the tools on the left, you can add various features to your site, which we will explain one by one.
First, choose a name for your site. To do this, enter your site name as shown below.
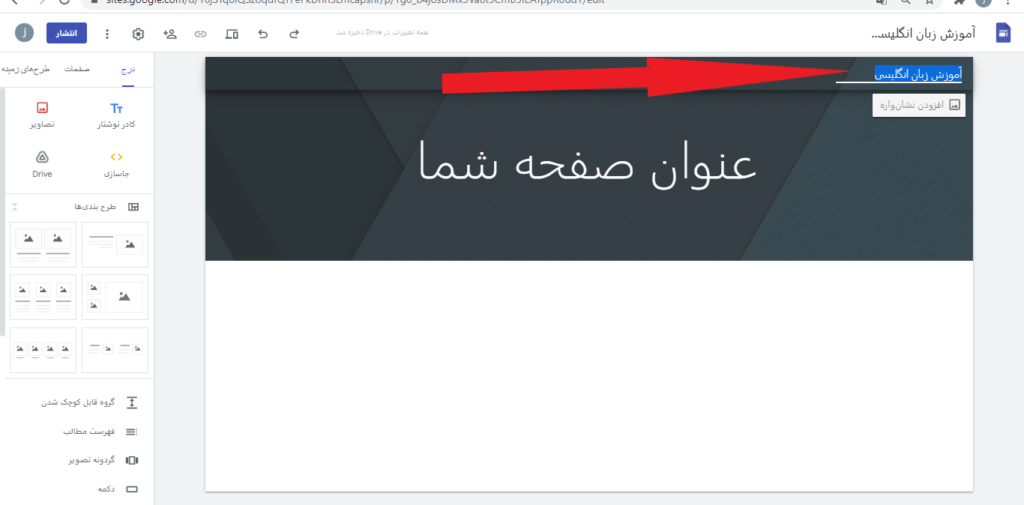
For example, here, we chose English language training for our site name.
Choose a logo for your site
To do this, click on the Add Bookmark option and select an image as your site logo.
When you click on the option to add a bookmark, you will see a new page, which has two items, “Upload” and “Select,” which if you click on the upload option, you can upload the desired image from your computer. If you click the Select option, You can select your image via web address or image search on google.
For example, we did a Google search for an image and clicked on the insert option. You can see that the logo has been added to the site.
Choose a title for your site
To select a title, click on the tab header and enter the title or theme of your site. From the section above shown in the image below, you can choose font size, text alignment, link insertion, text color, underline, diagonal title, and so on. Or choose to highlight the title.
For example, we entered the title “1st semester of English” here.
Choose a theme for your site
To select a theme or theme for your site, click on the third option, “Themes,” in the left column, and then you can choose one of the themes, each with its own name, such as “Simple, Aristotle, Diplomat, Dream,” Flat ”Choose one as your site theme. You can also choose the color and style of the font.
We have chosen a flat site theme here, which you can see in the image below.
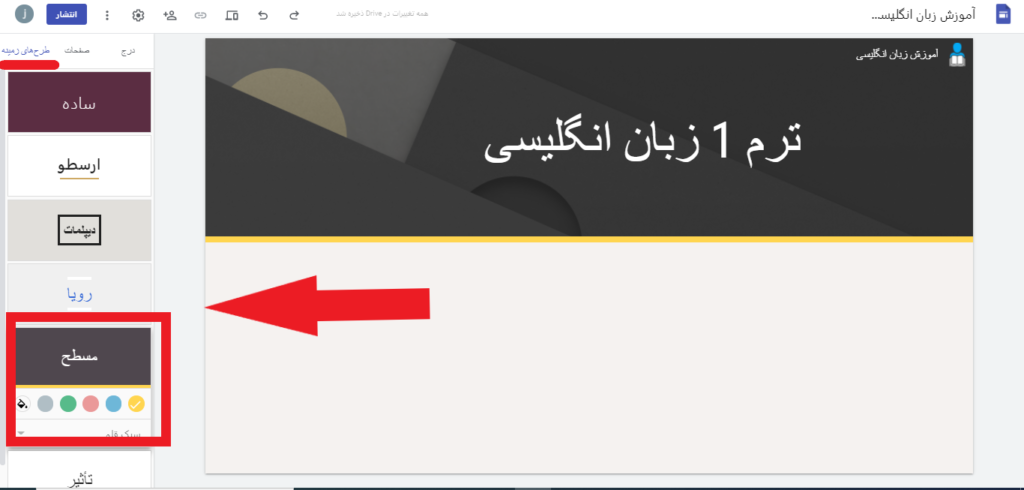
In fact, the image above is the banner or header of our site.
Change the background image of the site banner
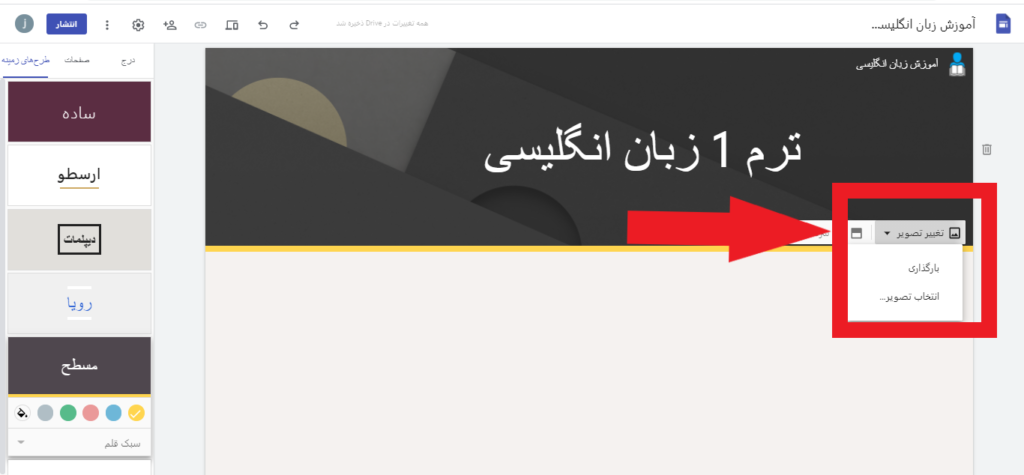
To change the background image of the banner in Google Site, click on the “Change Image” button according to the image below and upload your desired image by uploading it by your system, or by selecting the “Select Image” option, save your desired image by the gallery. Select Web address, Search, and.
We selected our image here by the gallery.
Content for site production
Now that you have created your site header and banner, under the header and in the content section, you can add any content such as text, image, video, map, and به to your site.
To add the said items to the content section of your site, you can access various options such as text box, images, embed, drive, and layouts from the left column in the insert tab.
You can add text content to your site using the “Text Box.”
You can add an image to your site using “Images.”
Using the “Embed” option, you can put a code in your content; for example, you can download the video code on YouTube and put it on your site.
Using the “Drive” option, you can import files from Google Drive into your site.
In the layouts section, you can use predefined templates on your site.
In the continuation of this column, you can use other options such as table of contents, buttons, map, and… to use on your site.
Take a look at the image below to understand the above description.
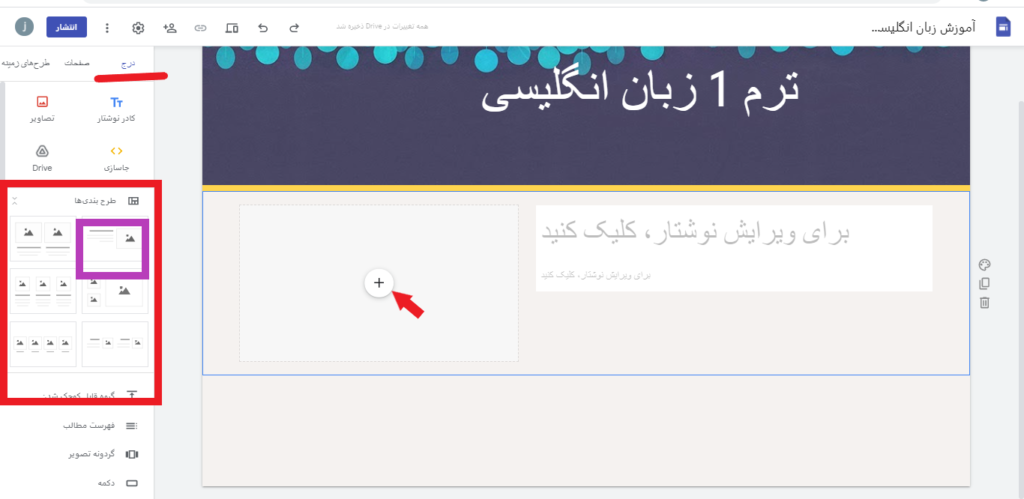
For example, we selected our favorite layout for our site from the layout. In the content section, we wrote our favorite content and uploaded the desired image.
Also, to add new elements to your site content, you can double-click in any space of your site to quickly access elements such as text, image, text box, etc.
For example, we select the Tt (text box) option. Then, the text add box opens for us on the page to write our content.
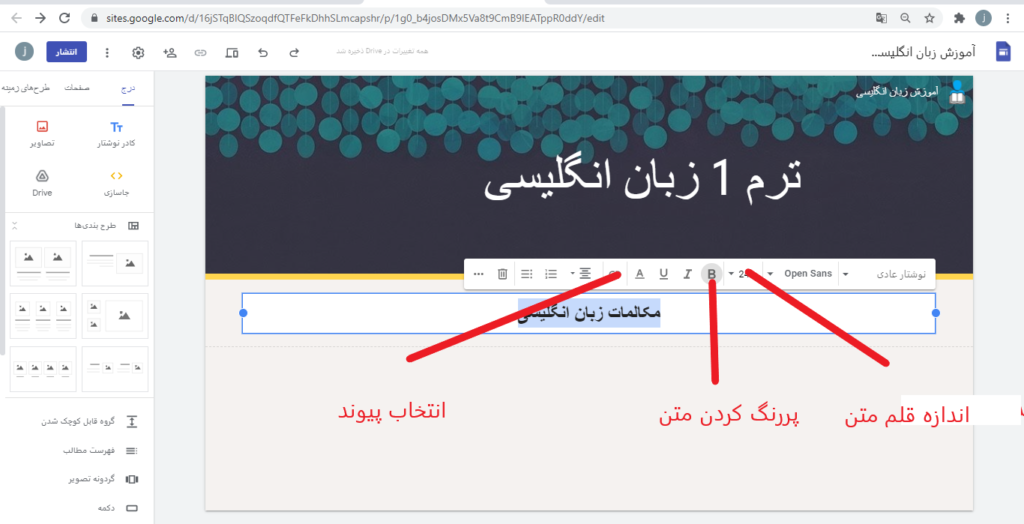
Using the text box toolbar, you can straighten, center, or left your text, add a link to your text via the link option, and bold your written text.
Take a look at the image below to understand the concepts above.
Link to text
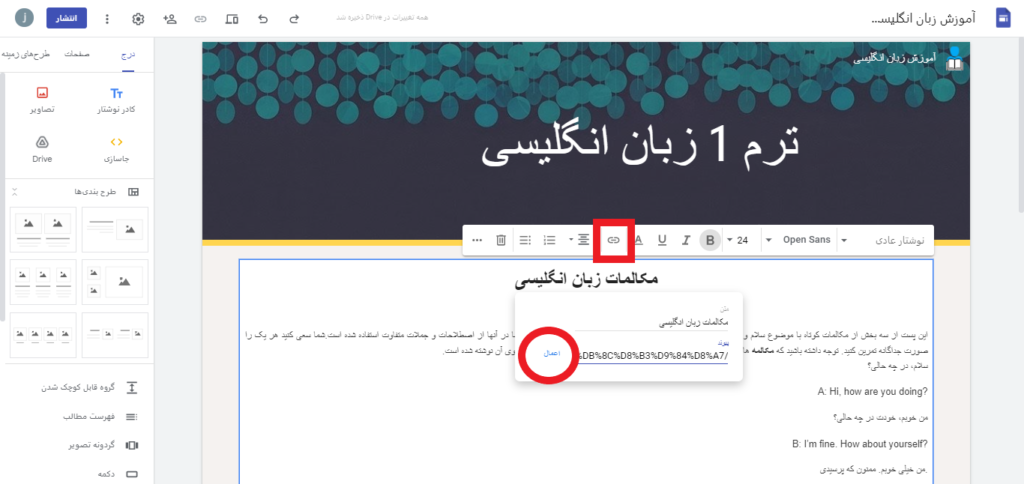
To do this, click on the desired text and then click on the link option in the text box toolbar; now, a window will open to enter the desired link address in the link field and then click on the option.
The image below shows the steps to link to the text. The text to which the link is created creates an underline that represents the link.
Add buttons to site content
To want to add a button to your site, select the “Button” element from the left column, and then in the window that opens, select a name for your button, and in the link area, give the link to the other pages of your site, then click on the button. Click insert.
Here we put the name of the button “Read this text.”
Preview the site on Google Sites
To see a preview of the site created on Google Site, you can click on the preview option in the toolbar at the top of your site on Google.
For the site you have created in Google, you can use the options specified in the image below to see how your site is displayed on various devices such as mobile, computer screen, or tablet.
Click the cross to return to the editing section of your site.
You can see a preview of the site we built on Google on mobile and tablet.
Add new pages to your site by Google Site
To add new pages to the site, just from the left column, click on the “Pages” tab and click on the + sign at the bottom; then, a new window will open asking you to name the new page, select the page name. And then click on the full option.
Here we have named the new page “Important English Words.”
Add footnotes to the site
If you scroll through your site page and scroll to the bottom of the page, you will see a button called “Add Footnote” that you can click to add a footer to your site.
In the footer section, you can add a menu, text, map, or image using the tutorials we have given so far.
Add a video on the site made with Google Site
To add a video to a site page, just click on the insert option in the left column, click the YouTube button and find the search section of the video you want, and then click on the option to select the desired video on your site. It will be uploaded.
Learning to change the background color of the site
For each content and element, you add to your site page in Google site; you can also give it a background color to distinguish it from other parts of your site.
All you have to do is click on the background selection option as shown below and select one of the options as desired.
You can even click on the image option and select your desired image as the background.
Publish the page on Google Site
Now that you have created your site and entered the content you want, you need to publish it so that everyone has access to your site.
All you have to do is click on the “Publish” option in the menu at the top left of the page; then, a new window will open.
In box 2, please select your desired address and enter it. For example, we selected the English address.
This is how our site address is displayed in Google as sites.google.com/view/English; then click on the publish option.
You can easily own your own website in minutes.
Good luck.


To post a comment, please register or log in first.